
Spring Security Part 5
실전 프로젝트 구성
Configurations
Dependency List
- Sprint Boot Web
- Spring Security
- Thymeleaf
- Lombok
- Spring Data JPA
- postgresql driver
Build.gradle
//Spring Boot Web
implementation 'org.springframework.boot:spring-boot-starter-web'
testImplementation 'org.springframework.boot:spring-boot-starter-test'

//Spring Security
implementation 'org.springframework.boot:spring-boot-starter-security'
testImplementation 'org.springframework.security:spring-security-test'

//Thymeleaf
implementation 'org.springframework.boot:spring-boot-starter-thymeleaf'
implementation 'org.thymeleaf.extras:thymeleaf-extras-springsecurity6'

//Lombok
compileOnly 'org.projectlombok:lombok'
annotationProcessor 'org.projectlombok:lombok'

//Spring Data Jpa
implementation 'org.springframework.boot:spring-boot-starter-data-jpa'

//Postgre
runtimeOnly 'org.postgresql:postgresql'
application.yaml
spring:
  datasource:
    url: jdbc:postgresql://localhost:5432/springsecurity
    username: postgres
    password: ********

  jpa:
    hibernate:
      ddl-auto: create
    properties:
      hibernate:
        format_sql: true
        jdbc:
          lob:
            non_contextual_creation: true

  devtools:
    livereload:
      enabled: true
    restart:
      enabled: true

  main:
    allow-bean-definition-overriding: true
Security Config
@Bean
public WebSecurityCustomizer webSecurityCustomizer() {
	return (web) ->
		web.ignoring().requestMatchers(PathRequest.toStaticResources().atCommonLocations());
}
js, css, img와 같은 정적 자원에 대해서는 보안 필터를 거치지 않도록한다. ignoring과 permitAll은 모든 권한을 허용해준다는 면에서 유사하지만, permitAll의 경우 보안 필터 내부에서 처리를 진행하게 된다.
Components
PasswordEncoder
입력 받은 비밀번호에 대하여 암호화를 수행하는 객체
@Bean
public PasswordEncoder passwordEncoder() {
	return PasswordEncoderFactories.createDelegatingPasswordEncoder();
}
DEFAULT으로 BcryptPasswordEncoder가 Bean으로 생성되게 된다.
UserDetailsService
authentication 과정에서 DB에 저장된 유저 정보를 받아서 UserDetails 형태로 추출해주는 작업을 진행한다. Spring에서는 메모리에 저장하게 되지만, DB 연동을 통해 DB로부터 유저를 받아오는 작업을 진행하기 위해 사용자 정의의 UsersDetailsService를 구현한다.
UsersDetailService interface
public interface UserDetailsService {
	UserDetails loadUserByUsername(String username) throws UsernameNotFoundException;
}
Spring Security에서 제공하는 interface를 구현한다. UserRepository를 활용하여 DB로부터 유저를 받아오고, 이를 기반으로 AccountContext를 반환, AccountContext는 내부에 Account 객체를 포함하고 있어 추후에 Account 객체를 뽑아서 쓸 수 있도록 한다. AccountContext는 User 클래스를 상속하므로써 UsersDetail을 구현하고 있다.
@Service
@RequiredArgsConstructor
public class CustomUserDetailsService implements UserDetailsService {
    private final UserRepository userRepository;

    @Override
    public UserDetails loadUserByUsername(String username) throws UsernameNotFoundException {
        Account account = userRepository.findByUsername(username);

        if (account == null) {
            throw new UsernameNotFoundException("UsernameNotFoundException");
        }
        List<GrantedAuthority> roles = new ArrayList<>();
        roles.add(new SimpleGrantedAuthority((account.getRole())));

        AccountContext accountContext = new AccountContext(account, roles);

        return accountContext;
    }
}

public class AccountContext extends User {
    private final Account account;
    public AccountContext(Account account, Collection<? extends GrantedAuthority> authorities) {
        super(account.getUsername(), account.getPassword(), authorities);
        this.account = account;
    }

    public Account getAccount() {
        return account;
    }
}
AuthenticationProvider
실제 인증 처리를 수행하는 Authentication Provider를 만들어서 등록한다.
AuthenticationProvider interface
public interface AuthenticationProvider {
	Authentication authenticate(Authentication authentication) throws AuthenticationException;
	boolean supports(Class<?> authentication);
}
특정 인증 로직을 처리하는 authenticate 메소드와 해당 인증 로직을 처리할 수 있는지의 유무를 판단하는 supports 메소드를 구현해주도록 한다. 아래와 같은 Provider을 구현해서 Bean 객체로 등록하게 되면 Spring Security 내부에서 자동으로 ProviderManager에 등록하게 되면서 인증 로직을 처리하게 된다.
CustomAuthenticationProvider
@Component
@RequiredArgsConstructor
public class CustomAuthenticationProvider implements AuthenticationProvider {

    private final UserDetailsService userDetailsService;
    private final PasswordEncoder passwordEncoder;

    @Override
    public Authentication authenticate(Authentication authentication) throws AuthenticationException {
        String loginId = authentication.getName();
        String passWord = (String)authentication.getCredentials();

        AccountContext userDetails = (AccountContext)userDetailsService.loadUserByUsername(loginId);

		//입력받은 ID에 해당하는 유저가 존재하는지 확인하고, 비밀번호를 검증한다.
        if(userDetails == null|| !passwordEncoder.matches(passWord,userDetails.getPassword())){
            throw new BadCredentialsException("BadCredentialException");
        }

		//인증이 완료되면 UsernamePasswordAuthenticationToken을 반환하도록 한다.
        return new UsernamePasswordAuthenticationToken(userDetails.getAccount(), null, userDetails.getAuthorities());
    }

	//UsernamePasswordAuthenticationToken을 가지고 있는 authentication에 대해서 처리하도록 한다.
    @Override
    public boolean supports(Class<?> authentication) {
        return UsernamePasswordAuthenticationToken.class.isAssignableFrom(authentication);
    }
}
만들어준 Provider에 대해서 AuthenticationManager에 등록해주는 작업을 진행해야한다.
Security Config
private final AuthenticationConfiguration authenticationConfiguration;

private final UserDetailsService customUserDetailsService;


@Bean
public PasswordEncoder passwordEncoder(){
    return PasswordEncoderFactories.createDelegatingPasswordEncoder();
}
@Bean
public CustomAuthenticationProvider customAuthenticationProvider(){
    return new CustomAuthenticationProvider(customUserDetailsService,passwordEncoder());
}

@Bean
public AuthenticationManager authenticationManager(AuthenticationConfiguration authConfiguration) throws Exception {
    ProviderManager authenticationManager = (ProviderManager)authConfiguration.getAuthenticationManager();
    authenticationManager.getProviders().add(0, customAuthenticationProvider());
    return authConfiguration.getAuthenticationManager();
}
Login Form Page
spring security에서 기본적으로 login page를 생성해서 사용자에게 전달할 수 있지만, 직접 로그인 화면을 구현한 경우 아래와 같이 설정작업을 진행한다. default으로 설정된 아이디와 패스워드에 대한 파라미터 이름은 username, password이므로 form tag에서 해당 파라미터명을 활용해야된다.
SecurityConfig
httpSecurity
	.formLogin()
	.loginPage("/login")
	.loginProcessingUrl("/login_proc")
	.permitAll()
login.html
<form th:action="@{/login_proc}" class="form-signin" method="post">
	<input th:type="hidden" th:value="secret" name="secret_key">
	<div class="form-group">
		<input type="text" class="form-control" name="username" placeholder="아이디" required="required"
				autofocus="autofocus">
	</div>
	<div class="form-group">
		<input type="password" class="form-control" name="password" placeholder="비밀번호" required="required">
	</div>

	<div class="form-group">
		Remember Me<input type="checkbox" name="remember-me" />
	</div>

	<button type="submit" class="btn btn-lg btn-primary btn-block">로그인</button>
</form>
Logout
로그아웃 수행을 위해 POST, GET 방식을 활용할 수 있지만, GET 기반으로 SecurityContextLogoutHandler을 이용하여 로그아웃 로직을 구현할 수 있다.
LoginController
@GetMapping("/logout")
public String logout(HttpServletRequest request, HttpServletResponse response) {
	Authentication authentication = SecurityContextHolder.getContext().getAuthentication();

	if (authentication != null) {
		new SecurityContextLogoutHandler().logout(request,response,authentication);
	}
	return "redirect:/login";
}
단, csrf 필터를 활성화한 경우에는, POST 기반의 로그아웃만 지원하는것을 주의하자
LogoutConfigurer
private RequestMatcher createLogoutRequestMatcher(H http) {
	RequestMatcher post = createLogoutRequestMatcher("POST");
	if (http.getConfigurer(CsrfConfigurer.class) != null) {
		return post;
	}
	RequestMatcher get = createLogoutRequestMatcher("GET");
	RequestMatcher put = createLogoutRequestMatcher("PUT");
	RequestMatcher delete = createLogoutRequestMatcher("DELETE");
	return new OrRequestMatcher(get, post, put, delete);
}
화면 보안 처리
Spring Security와 Thymeleaf을 활용하여 인증여부에 따른 메뉴 처리가 가능하다. 아래와 같이 메뉴바를 구성하는 html에서, sec:authorize property를 활용해서 인증 여부에 따른 보이는 메뉴를 제한할 수 있다.
top.html
<!DOCTYPE html>
<html lang="ko" xmlns:th="http://www.thymeleaf.org"
xmlns:sec="https://www.thymeleaf.org/thymeleaf-extras-springsecurity6">
	<div th:fragment="header">
		<nav class="navbar navbar-dark sticky-top bg-dark ">
			<div class="container">
				<a class="text-light" href="/"><h4>Core Spring Security</h4></a>
				<ul class="nav justify-content-end">
					<li class="nav-item" ><a class="nav-link text-light" href="/">HOME</a></li>
					<li sec:authorize="isAnonymous()" class="nav-item" ><a class="nav-link text-light" href="/login">로그인</a></li>
					<li sec:authorize="isAuthenticated()" class="nav-item" ><a class="nav-link text-light" href="/logout">로그아웃</a></li>
					<li class="nav-item" ><a class="nav-link text-light" th:href="@{/users}">회원가입하기</a></li>
				</ul>
			</div>
		</nav>
	</div>
</html>
WebAuthenticationDetails
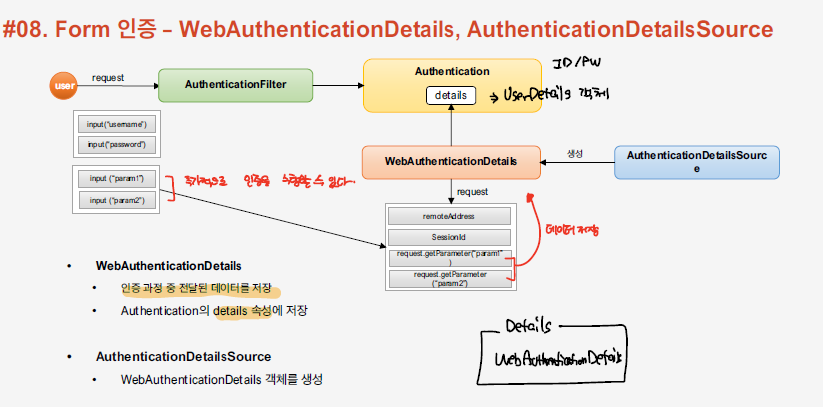
원래는, request가 들어왔을 때 AuthenticationFilter로 Id/Password 값만 넘어가게 된다. 하지만, 추가적으로 데이터를 저장해서 전달하기 위해 WebAuthenticationDetails 객체를 활용하여 UsersDetails 내부에 포함시킬 수 있다. AuthenticationDetailsSource는 WebAuthenticationDetails 객체를 UserDetails에 포함시키는 작업을 수행한다.
FormWebAuthenticationDetails
public class FormWebAuthenticationDetails extends WebAuthenticationDetails {
    private String secretKey;
    public FormWebAuthenticationDetails(HttpServletRequest request) {
        super(request);
        secretKey= request.getParameter("secret_key");

    }
    public String getSecretKey() {
        return secretKey;
    }
}
FormAuthenticationDetailsSource
@Component
public class FormAuthenticationDetailsSource implements AuthenticationDetailsSource<HttpServletRequest, FormWebAuthenticationDetails> {
    @Override
    public FormWebAuthenticationDetails buildDetails(HttpServletRequest context) {
        return new FormWebAuthenticationDetails(context);
    }
}
Security Config
public class SecurityConfig{
    private final AuthenticationDetailsSource authenticationDetailsSource;
    @Bean
    public SecurityFilterChain securityFilterChain(HttpSecurity httpSecurity) throws Exception{
        httpSecurity
            .authenticationDetailsSource(authenticationDetailsSource)
	}
}
AuthenticationSuccessHandler
인증이 성공했을 때, 수행되는 핸들러를 정의하자, AuthenticationSuccessHandler을 직접 구현해도 되지만, Spring에서 기본적으로 제공하는 구현체를 활용하여 상속해서 필요한 메소드만 overriding하도록 한다. 아래의 successhandler의 경우 이전에 요청된 url이 있으면 해당 경로로 redirect해주는 작업을 수행한다.
CustomAuthenticationSuccessHandler
@Component
public class CustomAuthenticationSuccessHandler extends SimpleUrlAuthenticationSuccessHandler {

    private RequestCache requestCache = new HttpSessionRequestCache();
    private RedirectStrategy redirectStrategy = new DefaultRedirectStrategy();

    @Override
    public void onAuthenticationSuccess(HttpServletRequest request, HttpServletResponse response,Authentication authentication) throws IOException, ServletException {
        setDefaultTargetUrl("/");

        SavedRequest savedRequest = requestCache.getRequest(request,response);

        if (savedRequest != null) {
            String redirectUrl = savedRequest.getRedirectUrl();
            redirectStrategy.sendRedirect(request,response,redirectUrl);
        }
        else{
            redirectStrategy.sendRedirect(request,response,getDefaultTargetUrl());
        }

    }
}
Security Config
public class SecurityConfig{
    private final AuthenticationSuccessHandler authenticationSuccessHandler;
    @Bean
    public SecurityFilterChain securityFilterChain(HttpSecurity httpSecurity) throws Exception{
        httpSecurity
            .successHandler(authenticationSuccessHandler)
	}
}
AuthenticationFailureHandler
인증이 실패했을 때, 수행되는 핸들러를 정의하자. 해당 Handler에서는 전달받은 exception의 종류에 따라 에러 메세지를 구성하여 해당 에러 메세지를 포함하여 로그인 경로로 redirect을 수행한다.
CustomAuthenticationFailureHandler
@Component
public class CustomAuthenticationFailureHandler extends SimpleUrlAuthenticationFailureHandler {
    @Override
    public void onAuthenticationFailure(HttpServletRequest request, HttpServletResponse response, AuthenticationException exception) throws IOException, ServletException {
        String errorMessage = "Invalid Username or Password";
        if (exception instanceof UsernameNotFoundException) {
            errorMessage = "Invalid Username or Password";
        } else if (exception instanceof InsufficientAuthenticationException) {
            errorMessage = " Invalid Secret Key";
        }
        setDefaultFailureUrl("/login?error=true&exception=" + errorMessage);
        super.onAuthenticationFailure(request, response, exception);
    }
}
LoginController
@GetMapping("/login")
public String login(@RequestParam(value="error",required=false)String error,
					@RequestParam(value="exception",required=false)String exception, Model model) {
	model.addAttribute("error", error);
	model.addAttribute("exception", exception);
	return "login";
}
login.html
<div th:if="${param.error}" class="form-group">
	<span th:text="${exception}"
			class="alert alert-danger">잘못된 아이디나 암호입니다</span>
</div>
Thymeleaf를 활용하여, error 변수가 넘어왔으면, 이는 인증 과정에서 문제가 발생하였음을 의미하며, 해당 에러 메세지를 출력하도록 한다.
Security Config
public class SecurityConfig{
    private final AuthenticationFailureHandler authenticationFailureHandler;
    @Bean
    public SecurityFilterChain securityFilterChain(HttpSecurity httpSecurity) throws Exception{
        httpSecurity
            .failureHandler(authenticationFailureHandler)
	}
}
AccessDeniedHandler
인가 검증이 실패하게 되면 AuthorityFilter에서는 ExceptionTranslationFilter로 AccessDeniedException을 전달하게 된다. 그러면, 해당 exception 처리를 위해 AccessDeniedHandler가 호출된다.
AccessDeniedHandler interface
public interface AccessDeniedHandler {
	void handle(HttpServletRequest request, HttpServletResponse response, AccessDeniedException accessDeniedException)
			throws IOException, ServletException;
}
인가 검증이 실패하게 되면, 저장된 에러 페이지로 redirect 시킨다.
CustomAccessDeniedHandler
public class CustomAccessDeniedHandler implements AccessDeniedHandler {
    private String errorPage;
    @Override
    public void handle(HttpServletRequest request, HttpServletResponse response, AccessDeniedException accessDeniedException) throws IOException, ServletException {
        String deniedUrl = errorPage + "?exception=" + accessDeniedException.getMessage();
        response.sendRedirect(deniedUrl);
    }

    public void setErrorPage(String errorPage) {
        this.errorPage = errorPage;
    }
}
LoginController
@GetMapping("/denied")
public String denied(@RequestParam(value="exception",required=false)String exception, Model model) {
	Authentication authentication = SecurityContextHolder.getContext().getAuthentication();
	Account account = (Account)authentication.getPrincipal();
	model.addAttribute("username", account.getUsername());
	model.addAttribute("exception", exception);
	return "/user/login/denied";
}
denied.html
<!DOCTYPE html>
<html lang="en" xmlns:th="http://www.thymeleaf.org"
      xmlns:sec="http://www.thymeleaf.org/thymeleaf-extras-springsecurity5">
	<head th:replace="layout/header::userHead"></head>
	<body>
		<div th:replace="layout/top::header"></div>

		<div class="container text-center" style="padding-top:50px">
				<h1><span th:text="${username}" class="alert alert-danger"></span></h1>
				<br />
				<h3 th:text="${exception}"></h3>
		</div>
		<div th:replace="layout/footer::footer"></div>
	</body>
</html>
Security Config
@Bean
public SecurityFilterChain securityFilterChain(HttpSecurity httpSecurity) throws Exception{
	httpSecurity.exceptionHandling()
		.accessDeniedHandler(accessDeniedHandler());

	return httpSecurity.build();
}
@Bean
public AccessDeniedHandler accessDeniedHandler() {
	CustomAccessDeniedHandler customAccessDeniedHandler = new CustomAccessDeniedHandler();
	customAccessDeniedHandler.setErrorPage("/denied");
	return customAccessDeniedHandler;
}
인증된 사용자 정보 접근
Spring Security를 활용하면 SecurityContext에 저장된 Authentication 객체에 접근이 가능하며, 해당 객체 내부에는 Account가 포함되어 있어 언제든지 유저 정보에 대한 접근이 가능하다는 장점이 있다.
Authentication authentication = SecurityContextHolder.getContext().getAuthentication();
Account account = (Account)authentication.getPrincipal();
References
link: inflearn
docs: spring_security
댓글남기기