
Spring Security Part 2
Session, Authorization, CSRF
Session
세션은 클라이언트와 서버 간에 논리적인 연결을 의미하는 것으로, 세션을 통해 클라이언트에 대한 정보를 저장하여 그 상태를 유지할 수 있다.
Concurrent Session Control
Spring Security를 활용하여 한 유저에 대한 세션의 갯수를 제한할 수 있다.
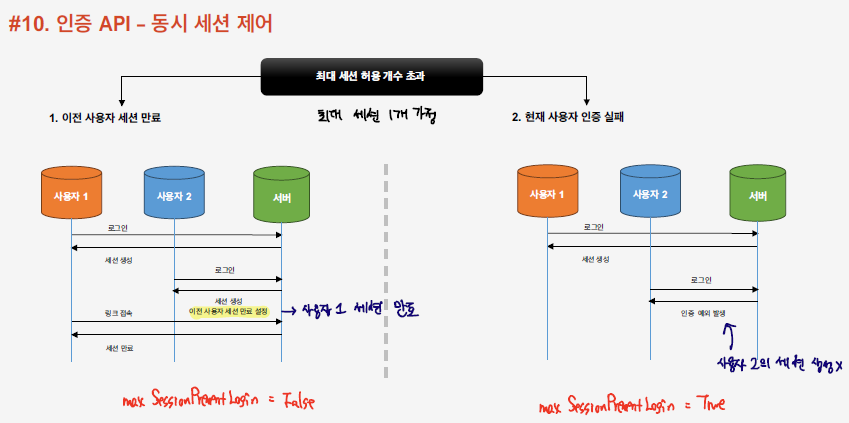
한 유저당 허용된 세션을 1로 설정하게 되면 위와 같이 이미 인증이 되어 세션을 가지고 있는 기존 유저가 있는 상태에서 새로운 유저가 인증을 시도하게 되면 두 방식으로 대응할 수 있다. 기존 유저의 세션을 끊는 방식과 현재 사용자에 대해 세션을 끊는 방식이 있다.
httpSecurity.sessionManagement()  //세션 관련 설정을 수행
    .maximumSessions(1) //최대 가능 세션의 갯수 지정, 한 인증에 대해 허용가능한 세션의 수
    .maxSessionsPreventsLogin(false)  //True로 설정하면 현재 사용자에 대한 인증을 허용하지 않고, False로 설정하면 기존 유저의 세션을 종료한다.
    .invalidSessionUrl("/invalid")  //세션이 유효하지 않을때 redirect url
    .expiredUrl("/expired");  //세션이 만료되었을 때의 redirect url
Sesssion Fixation Prevention
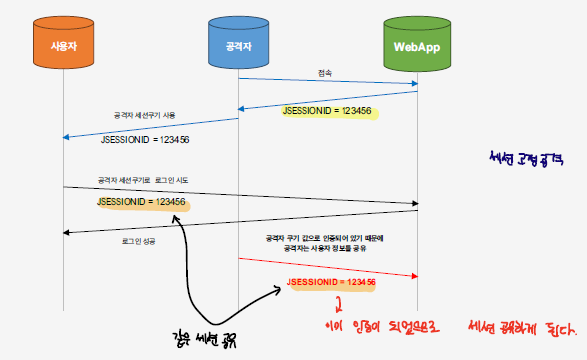
세션마다 고유의 세션 ID가 존재하는데, 이러한 세션 ID를 활용하여 공격을 할 수 있는데, 이를 세션 고정 공격이라고 한다.
-
공격자가 서버에 대한 접속을 하게 되면 세션 ID를 부여받게 된다.
-
공격자는 본인의 세션 ID를 사용자의 쿠키에 저장하여, 사용자는 해당 세션으로 인증을 수행한다.
-
사용자가 인증을 성공적으로 하게 되면, 공격자는 같은 세션을 유지하고 있는 것이 되므로 인증 없이 정상적으로 접속하게 된다.
이러한 공격을 피하기 위해서는 세션 ID를 매 요청마다 바꿔주도록 한다.
//세션 고정 보호
httpSecurity.sessionManagement()
    .sessionFixation().changeSessionId()
    //.sessionFixation().none() --> 세션 고정 보호 사용 X
세션 정책
세션을 생성하는 정책을 지정할 수 있다.
httpSecurity.sessionManagement()
    .sessionCreationPolicy(SessionCreationPolicy.ALWAYS);    //세션 정책
| Options | Description |
|---|---|
| SessionCreationPolicy.Always | 항상 세션을 생성하도록 한다. |
| SessionCreationPolicy.If_Required | 세션이 필요한 경우 세션을 생성하도록 한다. |
| SessionCreationPolicy.Never | 세션을 사용하지 않지만, 만약 기존에 세션이 있는 상태인 경우 세션을 사용한다. |
| SessionCreationPolicy.Stateless | 어떠한 경우에도 세션을 사용하지 않는다. |
Session Management flow
위의 세션 관련 작업들은 SessionManagementFilter 에 의해 동작하게 된다.
인증의 과정
- 우선 사용자가 인증을 시도하게 되면 SessionManagementFilter가 동작하게 되고, ConcurrentSessionControlAuthenticationStrategy을 호출하여 세션의 최대 허용 갯수를 검사한다.
SessionManagementFilter
private void doFilter(HttpServletRequest request, HttpServletResponse response, FilterChain chain){
  ...
  this.sessionAuthenticationStrategy.onAuthentication(authentication, request, response)
  ....
}
- ConcurrentSessionControlAuthenticationStrategy에서 세션의 최대 허용갯수를 넘는지, 넘지 않는지 확인한다.
ConcurrentSessionControlAuthenticationStrategy
public void onAuthentication(Authentication authentication, HttpServletRequest request,
			HttpServletResponse response) {
		int allowedSessions = getMaximumSessionsForThisUser(authentication);
		if (allowedSessions == -1) {
			// We permit unlimited logins
			return;
		}
		List<SessionInformation> sessions = this.sessionRegistry.getAllSessions(authentication.getPrincipal(), false);
		int sessionCount = sessions.size();
		if (sessionCount < allowedSessions) {
			// They haven't got too many login sessions running at present
			return;
		}
		if (sessionCount == allowedSessions) {
			HttpSession session = request.getSession(false);
			if (session != null) {
				// Only permit it though if this request is associated with one of the
				// already registered sessions
				for (SessionInformation si : sessions) {
					if (si.getSessionId().equals(session.getId())) {
						return;
					}
				}
			}
			// If the session is null, a new one will be created by the parent class,
			// exceeding the allowed number
		}
		allowableSessionsExceeded(sessions, allowedSessions, this.sessionRegistry);
	}
- ChangeSesionIdAuthenticationStrategy에 의해 session id를 변경하여 세션 고정 공격에 대한 보호를 수행한다.
@Override
	HttpSession applySessionFixation(HttpServletRequest request) {
		request.changeSessionId();
		return request.getSession();
	}
- RegisterSessionAuthenticationStrategy에 의해 세션이 생성되게 된다.
@Override
	public void onAuthentication(Authentication authentication, HttpServletRequest request,
			HttpServletResponse response) {
		this.sessionRegistry.registerNewSession(request.getSession().getId(), authentication.getPrincipal());
	}
Concurrent Session Management Flow
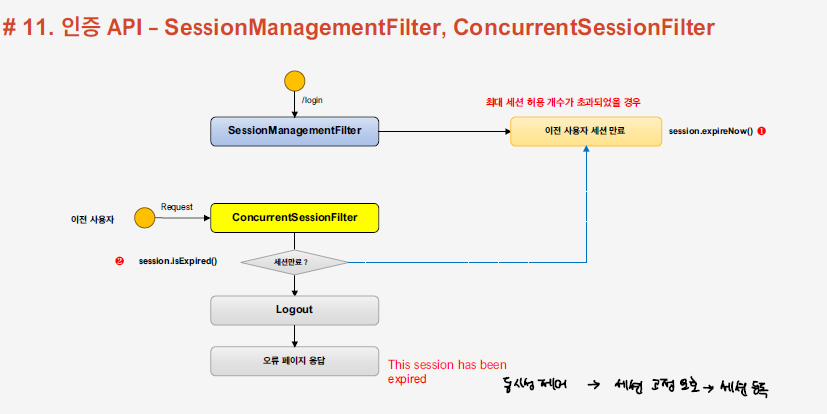
만약, 한 사용자에 대해 허용된 세션이 한 개인 경우, 최대 허용 세션 갯술르 넘어서는 세션 생성 요청이 왔을때는 그에 따른 처리가 요구된다.
- 우선, 위의 인증 작업에서 ConcurrentSessionControlAuthenticationStrategy을 통해 세션의 갯수를 검사하게 되는데, 이때 만약 최대 세션 허용갯수를 넘어서게 되면 아래와 같이 동작하게 된다.
if (sessionCount == allowedSessions) {
			HttpSession session = request.getSession(false);
			if (session != null) {
				// Only permit it though if this request is associated with one of the
				// already registered sessions
				for (SessionInformation si : sessions) {
					if (si.getSessionId().equals(session.getId())) {
						return;
					}
				}
			}
			// If the session is null, a new one will be created by the parent class,
			// exceeding the allowed number
		}
		allowableSessionsExceeded(sessions, allowedSessions, this.sessionRegistry);
- SecurityConfig에 설정한 maxSessionsPreventsLogin의 속성값에 따라 두 가지 방식으로 처리된다.
2-1. true 처리가 된 경우 현재 사용자에 대한 세션 생성을 허용하지 않는다.
protected void allowableSessionsExceeded(List<SessionInformation> sessions, int allowableSessions,
			SessionRegistry registry) throws SessionAuthenticationException {
    if (this.exceptionIfMaximumExceeded || (sessions == null)) {
      throw new SessionAuthenticationException(
          this.messages.getMessage("ConcurrentSessionControlAuthenticationStrategy.exceededAllowed",
              new Object[] { allowableSessions }, "Maximum sessions of {0} for this principal exceeded"));
    }
    ...
}
2-2-1. 만약 false 처리가 되었으면 이는, 기존 사용자에대하 세션을 만료하고 새로운 사용자에 대한 세션을 생서한다. 이후, 세션 id 변경, 세션 생성, 등의 작업을 수행하여 세션을 생성한다.
protected void allowableSessionsExceeded(List<SessionInformation> sessions, int allowableSessions,
			SessionRegistry registry) throws SessionAuthenticationException {
        ...
    // Determine least recently used sessions, and mark them for invalidation
    sessions.sort(Comparator.comparing(SessionInformation::getLastRequest));
    int maximumSessionsExceededBy = sessions.size() - allowableSessions + 1;
    List<SessionInformation> sessionsToBeExpired = sessions.subList(0, maximumSessionsExceededBy);
    for (SessionInformation session : sessionsToBeExpired) {
      session.expireNow();
    }
}
2-2-2. 현재 사용자의 경우 세션이 만료되고 ConcurrentSessionFilter에 의해 로그아웃 처리 된다.
> ConcurrentSessionFilter

```java
private void doFilter(HttpServletRequest request, HttpServletResponse response, FilterChain chain)
			throws IOException, ServletException {
		HttpSession session = request.getSession(false);
		if (session != null) {
			SessionInformation info = this.sessionRegistry.getSessionInformation(session.getId());
			if (info != null) {
				if (info.isExpired()) {
					// Expired - abort processing
					this.logger.debug(LogMessage
							.of(() -> "Requested session ID " + request.getRequestedSessionId() + " has expired."));
					doLogout(request, response);
					this.sessionInformationExpiredStrategy
							.onExpiredSessionDetected(new SessionInformationExpiredEvent(info, request, response));
					return;
				}
				// Non-expired - update last request date/time
				this.sessionRegistry.refreshLastRequest(info.getSessionId());
			}
		}
		chain.doFilter(request, response);
	}
Authentication+Session
실제 동작 과정을 살펴보면 SessionManagementFilter을 호출되기 보다는, 인증을 수행하고나서 바로 Session 관련 처리를 진행하게 된다. 아래의 AbstractAuthenticationProcessingFilter을 살펴보면, 인증을 수행하고나서 바로 session 관련 처리를 위해 sessionStrategy.onAuthentication() 메소드를 호출한다.
AbstractAuthenticationProcessingFilter
private void doFilter(HttpServletRequest request, HttpServletResponse response, FilterChain chain)
		throws IOException, ServletException {
	if (!requiresAuthentication(request, response)) {
		chain.doFilter(request, response);
		return;
	}
	try {
		Authentication authenticationResult = attemptAuthentication(request, response);
		if (authenticationResult == null) {
			// return immediately as subclass has indicated that it hasn't completed
			return;
		}
		this.sessionStrategy.onAuthentication(authenticationResult, request, response);
		// Authentication success
		if (this.continueChainBeforeSuccessfulAuthentication) {
			chain.doFilter(request, response);
		}
		successfulAuthentication(request, response, chain, authenticationResult);
	}
	catch (InternalAuthenticationServiceException failed) {
		this.logger.error("An internal error occurred while trying to authenticate the user.", failed);
		unsuccessfulAuthentication(request, response, failed);
	}
	catch (AuthenticationException ex) {
		// Authentication failed
		unsuccessfulAuthentication(request, response, ex);
	}
}
SessionStrategy의 구현체인 CompositeSessionAuthenticationStrategy이 실행된다. 해당 클래스에서는 SecurityConfig에 등록된 Session 관련 전략에 따른 작업들이 순차적으로 처리된다. 아래의 그림을 통해 this.delegateStrategies에 strategies가 할당된 것을 확인할 수 있다.
CompositeSessionAuthenticationStrategy
@Override
public void onAuthentication(Authentication authentication, HttpServletRequest request,
		HttpServletResponse response) throws SessionAuthenticationException {
	int currentPosition = 0;
	int size = this.delegateStrategies.size();
	for (SessionAuthenticationStrategy delegate : this.delegateStrategies) {
		if (this.logger.isTraceEnabled()) {
			this.logger.trace(LogMessage.format("Preparing session with %s (%d/%d)",
					delegate.getClass().getSimpleName(), ++currentPosition, size));
		}
		delegate.onAuthentication(authentication, request, response);
	}
}

Authorization
Spring Security를 활용하여 각 접속 경로에 대한 권한을 표현할 수 있다.
httpSecurity
    .authorizeHttpRequests()
    .requestMatchers("/login").permitAll()  // /login 경로에 대해서는 모두 허용한다.
    .requestMatchers("/user").hasRole("USER") // /user 경로에 대해서는 USER 권한을 가진 사용자만 허용한다.
    .requestMatchers("/admin/pay").hasRole("ADMIN") // /admin/pay는 ADMIN 권한을 가진 사용자에 대해서만 허용한다.
    .requestMatchers("/admin/**").access(new WebExpressionAuthorizationManager("hasRole('ADMIN') or hasRole('SYS')")) // /admin 이하의 모든 경로에 대해서는 ADMIN 혹은 SYS 권한이 요구된다.
항상 권한에 대한 설정의 경우 구체적인 경로에 대한 설정에서 범용적인 경로에대한 설정 순으로 진행한다. 그렇게 해야 구체적인 경로에 대한 권한 검증이 우선적으로 실행되기 때문이다.
위의 권한 설정 이외에도 아래와 같이 여러 권한 설정 메소드가 존재한다.
| Authorization | Description |
|---|---|
| denyAll() | 모든 접근을 제한한다. |
| authenticated() | 인증된 사용자의 접근 허용 |
| fullyAuthenticated() | 인증된 사용자의 접근 허용, rememberMe 인증을 통한 사용자의 접근은 포함하지 않는다. |
| anonymous() | 익명 사용자에 대한 접근만 허용한다(인증된 사용자는 접근 불가능) |
| rememberMe() | remember-me 인증을 통한 사용자의 접근 허용 |
Exception Handling
사용자가 특정 웹페이지(경로)에 대한 접속을 시도할 때 경우에 따라, 접속이 실패할 수 있는데, 이 과정에서의 예외 처리를 진행하게 된다.
예외에는 크게 2가지의 예외가 존재한다.
- AuthenticationException
인증이 실패해서 발생하는 예외로, AuthenticationEntryPoint을 호출하여 로그인 페이지로 redirect 된다. 이 과정에서 RequestCacheAwareFilter가 동작하게 되면서 SavedRequest 객체를 통해 사용자가 이전에 접속하려고 했던 url, paramter 값,등의 헤더값들을 저장한다.
- AccessDeniedException
인가 실패로, 해당 경로에 대한 권한이 없어서 발생하는 예외로, AccessDeniedHandler가 이를 처리한다.
httpSecurity.exceptionHandling()
    .authenticationEntryPoint(new AuthenticationEntryPoint() {  //인증 실패에 대한 핸들러
        @Override
        public void commence(HttpServletRequest request, HttpServletResponse response, AuthenticationException authException) throws IOException, ServletException {
            response.sendRedirect("/login"); //spring security가 제공하는 login이 아닌 사용자가 정의한 login page로 이동하기 때문에, login 요청에 대한 url mapping이 필요하며, 인증 절차에서 permitAll 처리가 요구된다.
        }
    })
    .accessDeniedHandler(new AccessDeniedHandler() {  //인가 실패에 대한 핸들러
        @Override
        public void handle(HttpServletRequest request, HttpServletResponse response, AccessDeniedException accessDeniedException) throws IOException, ServletException {
            response.sendRedirect("/denied");
        }
    });
ExceptionTranslationFilter의 동작 과정

ExceptionTranslationFilter은 AuthenticationException, AccessDeniedException에 따라서 분기하여 처리를 수행한다.
ExceptionTranslationFilter
private void doFilter(HttpServletRequest request, HttpServletResponse response, FilterChain chain)
			throws IOException, ServletException {
		try {
			chain.doFilter(request, response);
		}
		catch (IOException ex) {
			throw ex;
		}
		catch (Exception ex) {
			// Try to extract a SpringSecurityException from the stacktrace
			Throwable[] causeChain = this.throwableAnalyzer.determineCauseChain(ex);
			RuntimeException securityException = (AuthenticationException) this.throwableAnalyzer
					.getFirstThrowableOfType(AuthenticationException.class, causeChain);
			if (securityException == null) {
				securityException = (AccessDeniedException) this.throwableAnalyzer
						.getFirstThrowableOfType(AccessDeniedException.class, causeChain);
			}
			if (securityException == null) {
				rethrow(ex);
			}
			if (response.isCommitted()) {
				throw new ServletException("Unable to handle the Spring Security Exception "
						+ "because the response is already committed.", ex);
			}
			handleSpringSecurityException(request, response, chain, securityException);
		}
}

private void handleSpringSecurityException(HttpServletRequest request, HttpServletResponse response,
			FilterChain chain, RuntimeException exception) throws IOException, ServletException {
		if (exception instanceof AuthenticationException) {
			handleAuthenticationException(request, response, chain, (AuthenticationException) exception);
		}
		else if (exception instanceof AccessDeniedException) {
			handleAccessDeniedException(request, response, chain, (AccessDeniedException) exception);
		}
	}
AuthenticationException 처리
- AuthenticationException 인 경우 아래와 같이 authenticationException 처리를 위한 메소드를 실행하게 된다.
private void handleAuthenticationException(HttpServletRequest request, HttpServletResponse response,
			FilterChain chain, AuthenticationException exception) throws ServletException, IOException {
		this.logger.trace("Sending to authentication entry point since authentication failed", exception);
		sendStartAuthentication(request, response, chain, exception);
	}

protected void sendStartAuthentication(HttpServletRequest request, HttpServletResponse response, FilterChain chain,
			AuthenticationException reason) throws ServletException, IOException {
		// SEC-112: Clear the SecurityContextHolder's Authentication, as the
		// existing Authentication is no longer considered valid
		SecurityContext context = this.securityContextHolderStrategy.createEmptyContext();
		this.securityContextHolderStrategy.setContext(context);
		this.requestCache.saveRequest(request, response);
		this.authenticationEntryPoint.commence(request, response, reason);
	}
- requestCache의 saveRequest 메소드를 통해서 SavedReqeust 객체를 저장하도록 한다.
@Override
public void saveRequest(HttpServletRequest request, HttpServletResponse response) {
  if (!this.requestMatcher.matches(request)) {
    if (this.logger.isTraceEnabled()) {
      this.logger.trace(
          LogMessage.format("Did not save request since it did not match [%s]", this.requestMatcher));
    }
    return;
  }

  if (this.createSessionAllowed || request.getSession(false) != null) {
    // Store the HTTP request itself. Used by
    // AbstractAuthenticationProcessingFilter
    // for redirection after successful authentication (SEC-29)
    DefaultSavedRequest savedRequest = new DefaultSavedRequest(request, this.portResolver,
        this.matchingRequestParameterName);
    request.getSession().setAttribute(this.sessionAttrName, savedRequest);
    if (this.logger.isDebugEnabled()) {
      this.logger.debug(LogMessage.format("Saved request %s to session", savedRequest.getRedirectUrl()));
    }
  }
  else {
    this.logger.trace("Did not save request since there's no session and createSessionAllowed is false");
  }
}
- 그 다음으로, AuthorizationEntryPoint을 통한 작업들이 실행된다.
@Override
public void commence(HttpServletRequest request, HttpServletResponse response,
 AuthenticationException authException) throws IOException {
  response.addHeader("WWW-Authenticate", "Basic realm=\"" + this.realmName + "\"");
  response.sendError(HttpStatus.UNAUTHORIZED.value(), HttpStatus.UNAUTHORIZED.getReasonPhrase());
}
AccessDeniedException 처리
AccessDeniedException 오류의 경우 해당 핸들러에 의해서 처리되며, default로 403 forbidden page을 반환한다.
AccessDeniedExceptionHandler
@Override
	public void handle(HttpServletRequest request, HttpServletResponse response,
			AccessDeniedException accessDeniedException) throws IOException, ServletException {
		if (response.isCommitted()) {
			logger.trace("Did not write to response since already committed");
			return;
		}
		if (this.errorPage == null) {
			logger.debug("Responding with 403 status code");
			response.sendError(HttpStatus.FORBIDDEN.value(), HttpStatus.FORBIDDEN.getReasonPhrase());
			return;
		}
		// Put exception into request scope (perhaps of use to a view)
		request.setAttribute(WebAttributes.ACCESS_DENIED_403, accessDeniedException);
		// Set the 403 status code.
		response.setStatus(HttpStatus.FORBIDDEN.value());
		// forward to error page.
		if (logger.isDebugEnabled()) {
			logger.debug(LogMessage.format("Forwarding to %s with status code 403", this.errorPage));
		}
		request.getRequestDispatcher(this.errorPage).forward(request, response);
	}
CSRF Filter
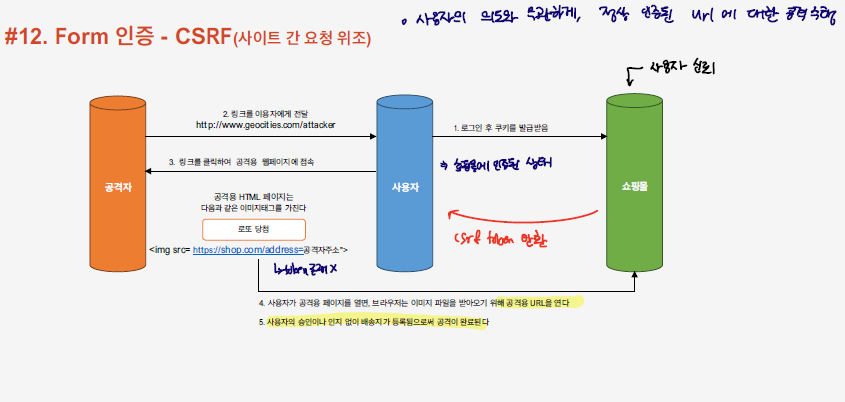
사용자가 특정 사이트에 인증이 되어 있는 상태를 활용하여, 공격자는 사용자로 하여금 해당 사이트에 원하는 작업을 실행하도록 한다. 이런 상황에서, 사이트는 이미 신뢰된 사용자의 접근인 것을 인지하여 해당 작업에 대한 처리를 진행한다. 이렇게 사용자의 의도와 무관하게 정상 인증된 서버에 대한 공격을 수행하는 것을 CSRF 공격이라고 한다.
이러한, csrf 공격을 막기 위해, 매 요청마다 CSRF_TOKEN을 발행하여, CSRF_TOKEN이 일치하는 경우에만 접근을 허용하도록 하는 방식을 통해 CSRF 공격을 예방할 수 있다.
httpSecurity.csrf() //csrf 예방 기능 활성화
//.csrf().disabled() 비활성화
<!DOCTYPE html>
<html lang="en">
  <head>
    <meta charset="utf-8">
    <meta name="viewport" content="width=device-width, initial-scale=1, shrink-to-fit=no">
    <meta name="description" content="">
    <meta name="author" content="">
    <title>Please sign in</title>
    <link href="https://maxcdn.bootstrapcdn.com/bootstrap/4.0.0-beta/css/bootstrap.min.css" rel="stylesheet" integrity="sha384-/Y6pD6FV/Vv2HJnA6t+vslU6fwYXjCFtcEpHbNJ0lyAFsXTsjBbfaDjzALeQsN6M" crossorigin="anonymous">
    <link href="https://getbootstrap.com/docs/4.0/examples/signin/signin.css" rel="stylesheet" crossorigin="anonymous"/>
  </head>
  <body>
     <div class="container">
      <form class="form-signin" method="post" action="/login_proc">
        <h2 class="form-signin-heading">Please sign in</h2>
        <p>
          <label for="username" class="sr-only">Username</label>
          <input type="text" id="username" name="userId" class="form-control" placeholder="Username" required autofocus>
        </p>
        <p>
          <label for="password" class="sr-only">Password</label>
          <input type="password" id="password" name="passwd" class="form-control" placeholder="Password" required>
        </p>
<p><input type='checkbox' name='remember'/> Remember me on this computer.</p>
<input name="_csrf" type="hidden" value="itgy7eAjYdP_25vE_u6qD7XHIJUBQzLKOwgPCFaZCOuGtNSs7uwGiIQVUbHS7f-iy8OeONHyDaxjcwvnXm49MGX9Pt611uPO" />
        <button class="btn btn-lg btn-primary btn-block" type="submit">Sign in</button>
      </form>
</div>
</body></html>
login 창의 html을 분석해보면 _csrf token이 포함된것을 확인할 수 있다. 이런식으로, csrf token을 전송해서, csrf token을 가진 유저에 대한 접근만을 허용하도록 한다.
CSRF Filter
@Override
	protected void doFilterInternal(HttpServletRequest request, HttpServletResponse response, FilterChain filterChain)
			throws ServletException, IOException {
		DeferredCsrfToken deferredCsrfToken = this.tokenRepository.loadDeferredToken(request, response);
		this.requestHandler.handle(request, response, deferredCsrfToken::get);
		if (!this.requireCsrfProtectionMatcher.matches(request)) {
			if (this.logger.isTraceEnabled()) {
				this.logger.trace("Did not protect against CSRF since request did not match "
						+ this.requireCsrfProtectionMatcher);
			}
			filterChain.doFilter(request, response);
			return;
		}
		CsrfToken csrfToken = deferredCsrfToken.get();
		String actualToken = this.requestHandler.resolveCsrfTokenValue(request, csrfToken);
		if (!equalsConstantTime(csrfToken.getToken(), actualToken)) {
			boolean missingToken = deferredCsrfToken.isGenerated();
			this.logger.debug(
					LogMessage.of(() -> "Invalid CSRF token found for " + UrlUtils.buildFullRequestUrl(request)));
			AccessDeniedException exception = (!missingToken) ? new InvalidCsrfTokenException(csrfToken, actualToken)
					: new MissingCsrfTokenException(actualToken);
			this.accessDeniedHandler.handle(request, response, exception);
			return;
		}
		filterChain.doFilter(request, response);
	}
References
link: inflearn
docs: spring_security
댓글남기기