
Java Spring MVC part 5
Basic HTTP Request, Response with SpringMVC
SLF4J Logger
spring boot에서는 기본적으로 SLF4J 방식의 인터페이스를 제공하며, 내부적으로 LogBack 라이브러리를 로거로 사용한다.
Logger을 이용해서 로그를 남기게 되면 System.out.println과 달리 다양한 기능들을 활용할 수 있다.
private final Logger log=LoggerFactory.getLogger(getClass());
@RequestMapping("/log-test")
public String logTest(){
    String name = "Spring";

    System.out.println("name = " + name);
    log.trace("trace log={}",name);
    log.debug("debug log={}",name);
    log.info("info log={}",name);
    log.warn("warn log={}",name);
    log.error("error log={}",name);

    return "ok";
}
@RestController 위와 같이 @Controller가 아닌, @RestController로 실행하게 되면 메소드의 반환값으로 뷰를 찾지 않고 바로 HTTP Body에 값을 추가해서 HTTP Response를 보내게 된다.
Logger을 이용하게 되면 로그 레벨 설정을 통한 로그 출력이 가능하다.
로그 레벨은 TRACE> DEBUG> INFO> WARN> ERROR 으로 이루어 져있는데, 로그레벨을 설정하게 되면 상위 레벨을 출력이 되지 않는다. 보통 개발 환경에서는 DEBUG 레벨을, 운영환경에서는 INFO 레벨로 설정해서 로그를 남긴다.
application.properties
//전체 로그 레벨 설정(기본 info)
logging.level.root=info

//hello.springmvc 패키지와 그 하위 로그 레벨 설정
logging.level.hello.springmvc=debug
application.properties에서 로그 레벨을 지정할 수 있다. 위와 같이 설정할 경우 springmvc 하위의 패키지에 대해서는 debug 레벨로 설정되어 아래와 같이 TRACE를 제외한 모든 로고가 출력된다.
2022-06-27 21:32:54.511 DEBUG 14952 --- [nio-8080-exec-1] hello.springmvc.basic.LogTestController  : debug log=Spring
2022-06-27 21:32:54.512  INFO 14952 --- [nio-8080-exec-1] hello.springmvc.basic.LogTestController  : info log=Spring
2022-06-27 21:32:54.512  WARN 14952 --- [nio-8080-exec-1] hello.springmvc.basic.LogTestController  : warn log=Spring
2022-06-27 21:32:54.512 ERROR 14952 --- [nio-8080-exec-1] hello.springmvc.basic.LogTestController  : error log=Spring
log.debug("data="+data);
log.debug("data={}",data);
로그는 위의 두가지 방식 모두 지원하는데, 첫번째 방식은 완전한 문자열을 인자로 전달했고, 두번째 방식은 파라미터를 이용해서 로그를 만들었다.
만약, 로그 레벨이 INFO로 설정되어 있게 되면, 첫번째 방식으로는 문자열 연산은 발생하지만 로그는 출력되지 않고, 두번째 방식에서는 아무런 동작을 수행하지 않는다. 즉, 첫번째 방식으로는 로그 레벨이 맞지 않더라도 문자열 연산은 실행된다는 의미이다. 따라서, 무의미한 연산을 수행 방지를 위해 아래의 방식으로 로그를 생성하는 것이 좋다.
Logger을 이용해서 로그를 남기면 위와 같이, TIME, THREAD, CLASS 등의 정보가 함께 출력되어 로그 분석을 통해 필요한 정보들을 쉽게 얻어낼 수 있다. 또한, 콘솔 이외에도 파일, 네트워크, 등에 로그를 남기도록 설정할 수 있다.
또한, SLF4J 방식의 로거는 @Slf4j annotation을 명시하게 되면 롬복에서 Logger 객체를 자동으로 만든다.
@RequestMappings
기존에, @RequestMapping을 통해 URL 매핑을 수행할 수 있던것을 확인했다. 이번에는 path variable이나, header, content-type 같은 특수한 경우에 대한 url 매핑을 수행해보자
PathVariable
@GetMapping("/mapping/{userId}")
public String mappingPath(@PathVariable("userId") String data){
    logger.info("mapping Path: {}",data);
    return "OK";
}
@PathVariable을 이용해서 받고자하는 parameter name을 명시한다.
/mapping/1로 request가 들어오면 –> userId 값에 1이 들어가게 된다.
Multiple PathVariables
@GetMapping("/mapping/users/{userId}/orders/{orderId}")
public String mappingPath(@PathVariable String userId, @PathVariable String orderId){
    logger.info("mapping Path userId={},orderId={}",userId,orderId);
    return "OK";
}
위와 같이 여러개의 parameter을 동시에 받을 수도 있다.
Specific Parameter Mapping
@GetMapping(value = "/mapping-param", params = "mode=debug")
public String mappingParam() {
    logger.info("mappingParam");
    return "ok";
}
params을 이용해서 특정 파라미터 조건을 명시한다. /mapping-param?mode=debug 와 같이 query parameter을 전달하면 해당 메소드가 실행된다.
Specific Header Mapping
@GetMapping(value = "/mapping-header", headers = "mode=debug")
public String mappingHeader() {
    logger.info("mappingHeader");
    return "ok";
}
headers을 이용해서 헤더 조건 명시 http에 헤더에 mode=debug가 있으면 해당 메소드가 수행된다.
Specific Media Type
@PostMapping(value = "/mapping-consume", consumes = "application/json")
public String mappingConsumes() {
    logger.info("mappingConsumes");
    return "ok";
}
consumes을 이용해서 http request의 content-type 지정
content-type이 application/json인 http request를 받을 수 있다.
Specific Accept Type
@PostMapping(value = "/mapping-produce", produces = "text/html")
public String mappingProduces() {
    logger.info("mappingProduces");
    return "ok";
}
produces을 명시해서 해당 http response의 타입을 명시한다.
http request의 ACCESS Type이 text/html로 설정되어 있어야 해당 메소드를 수행할 수 있다.
HTTP API Example
@RestController
@RequestMapping("/mapping/users")
public class MappingClassController {

    @GetMapping
    public String user(){
        return "get users";
    }
    @PostMapping
    public String addUser(){
        return "post user";
    }
    @GetMapping("/{userId}")
    public String findUser(@PathVariable String userId){
        return "get userId= "+userId;
    }
    @PatchMapping("/{userId}")
    public String patchUser(@PathVariable String userId){
        return "update userId="+userId;
    }
    @DeleteMapping("/{userId}")
    public String deleteUser(@PathVariable String userId){
        return "delete userId="+userId;
    }
}
다음과 같이 Annotation을 이용해서 각각의 HTTP Method에 대한 매핑을 수행할 수 있다. Spring MVC에서는 이 처럼 다양한 Annotation을 제공해서 개발자가 간편하게 개발할 수 있도록 지원한다.
Http Requests
Header
서블릿에서는 HttpServletRequest 객체를 이용해서 header 정보를 추출할 수 있었다. Spring MVC에서는 어떻게 수행할까?
@RestController
public class RequestHeaderController {
    @RequestMapping("/headers")
    public String headers(HttpServletRequest request, HttpServletResponse response, HttpMethod httpMethod, Locale locale, @RequestHeader MultiValueMap<String, String> headerMap, @RequestHeader("host") String host, @CookieValue(value = "myCookie", required = false) String cookie){
        log.info("request={}", request);
        log.info("response={}", response);
        log.info("httpMethod={}", httpMethod);
        log.info("locale={}", locale);
        log.info("headerMap={}", headerMap);
        log.info("header host={}", host);
        log.info("myCookie={}", cookie);
        return "ok";
    }
}
Spring MVC에서는 annotation을 기반으로 생성된 controller에 대해 다양한 파라미터를 제공한다.
- HttpMethod 객체를 이용해서 Http Method
- Locale 객체를 이용해서 Locale 정보를
- @RequestHeader을 이용해서 Header 정보를
- @RequestHeader(“header_option”)를 이용해서 특정 헤더값을
- @Cookie을 이용해서 특정 쿠키값을
조회할 수 있다.
MultiValueMap
Map과 유사하지만, Map과 달리 동일 키에 대해 복수개의 값을 저장할 수 있다.
keyA=value1&keyA=value2 와 같이 parameter 요청을 받았다고 하자 그러면, keyA에 대해 리스트값을 가지게 된다.
MultiValueMap<String,String> map=new LinkedMultiValueMap();
map.add("keyA","value1");
map.add("keyA","value2");

map.get("keyA") ==> ["value1","value2"]
Request Parameters
GET, POST 방식으로 전송된 parameter는 key=value&key=value의 구조로 동일하다. 이런 parameter 요청을 어떻게 수용할까?
HttpServlet
@RequestMapping("/request-param-v1")
public void requestParamV1(HttpServletRequest request, HttpServletResponse response) throws IOException {
    String username = request.getParameter("username");
    int age = Integer.parseInt(request.getParameter("age"));

    log.info("log info= username:{} age:{}",username,age);
    response.getWriter().write("ok");
}
HttpServletRequest 객체를 이용해서 parameter을 조회할 수 있다.
@RequestParam
@ResponseBody
@RequestMapping("/request-param-v2")
public String requestParamV2(@RequestParam("username") String username,@RequestParam("age") int age) throws IOException {
    log.info("log info= username:{} age:{}",username,age);
    return "ok";
}
@RequestParam을 이용해서 조회하고자 하는 parameter name을 명시한다.
@ResponseBody
@RequestMapping("/request-param-v3")
public String requestParamV3(@RequestParam String username,@RequestParam int age) throws IOException {
    log.info("log info= username:{} age:{}",username,age);
    return "ok";
}
만약 변수 이름이 파라미터 이름과 같으면 @RequestParam name 옵션을 생략할 수 있다.
@ResponseBody
@RequestMapping("/request-param-v4")
public String requestParamV4(String username,int age) throws IOException {
    log.info("log info= username:{} age:{}",username,age);
    return "ok";
}
만약 String, int 와 같은 기본타입이거나 Wrapper 클래스이면 @RequestParam도 생략할 수 있다.
@ResponseBody
@RequestMapping("/request-param-required")
public String requestParamRequired(@RequestParam(required=true) String username,@RequestParam(required=false) Integer age) throws IOException {
    log.info("log info= username:{} age:{}",username,age);
    return "ok";
}
required 옵션을 추가해서 해당 파라미터의 필수 여부를 지정할 수 있다. 위와같은 경우 /request-param-required?username=hello 와 같이 명시해도 요청을 받아 들일 수 있다. 이때, 주의할 점이 있는데, 파라미터가 전달되지 않는 경우 null값으로 저장되기 때문에 int와 같은 기본타입에는 null이 저장되지 않으므로 Integer와 같은 Wrapper 클래스를 활용해야한다.
username= 와 같이 전달하게 되면 “” 빈문자열이 저장된다.
@ResponseBody
@RequestMapping("/request-param-default")
public String requestParamDefault(@RequestParam(required=true, defaultValue = "guest") String username,@RequestParam(required=false,defaultValue = "-1") int age) throws IOException {
    log.info("log info= username:{} age:{}",username,age);
    return "ok";
}
defaultValue 옵션을 이용해서 파라미터가 전달되지 않았을 때 설정할 수 있는 기본값을 지정할 수 있다. defaultValue가 설정되어 있는 required는 무시되게 된다.
@ResponseBody
@RequestMapping("/request-param-map")
public String requestParamMap(@RequestParam Map<String,Object> paramMap) throws IOException {
    log.info("log info= username:{} age:{}",paramMap.get("username"),paramMap.get("age"));
    return "ok";
}
위와 같이 Map 형태로 parameter을 받을 수 있다.
@ResponseBody
@RequestMapping("/request-param-multivaluemap")
public String requestParamMultiValueMap(@RequestParam MultiValueMap<String, Object> paramMap) throws IOException {
    log.info("log info= username:{} age:{}",paramMap.get("username"),paramMap.get("age"));
    return "ok";
}
Map 대신 MultiValueMap을 활용할 수 있다.
@ModelAttribute
파라미터에 대해서 객체 형태로 받아서 객체에 대해 접근을 할 수 있다.
package hello.springmvc.basic;
import lombok.Data;
@Data
public class HelloData {
    private String username;
    private int age;
}
Lombok 의 @Data annotation을 이용하면 @Getter, @Setter, @ToString, @EqualsAndHashCode, @RequiredArgsConstructor annotation을 적용한다.
@ResponseBody
@RequestMapping("/model-attribute-v1")
public String modelAttributeV1(@ModelAttribute HelloData helloData){
    log.info("log info= username:{} age:{}",helloData.getUsername(),helloData.getAge());
    return "ok";
}
@ModelAttribute을 이용해서 객체 형태로 데이터를 받는 것이 가능하다. Spring MVC에서 객체를 생성하고, setter을 이용해서 값을 저장한다.
HelloData의 age에는 int 데이터가 추가되야 하는데, 만약 “abc” 와 같은 string 형태의 데이터가 요청으로 들어오면 BindException 에러가 발생한다.
@ResponseBody
@RequestMapping("/model-attribute-v2")
public String modelAttributeV2(HelloData helloData){
    log.info("log info= username:{} age:{}",helloData.getUsername(),helloData.getAge());
    return "ok";
}
Model Attribute에 지정한 파라미터 클래스의 필드 타입이 단순형이면 @ModelAttribute annotation도 생략할 수 있다. 단, argument resolver로 지정해둔 타입외에서만 적용된다.
@RequestParam, @ModelAttribute이 모두 생략되어 있으면, 우선적으로 단순 타입의 경우 @RequestParam이 적용되고, 나머지에 대해서 @ModelAttribute이 적용된다.
HTTP Message Body
String Type
기존에는 Request Parameter 형태로, query paramter 또는 Form 형태의 data에 대한 paramter을 받았다면, 이번에는 Message Body로 들어오는 형태의 parameter는 어떻게 활용하는 지 알아보자
InputStream
InputStream을 이용해서 Http Message Body에 직접 접근하는 방식이다
@PostMapping("/request-body-string-v1")
public void requestBodyStringV1(HttpServletRequest request, HttpServletResponse response) throws IOException {
    ServletInputStream inputStream = request.getInputStream();
    String messageBody = StreamUtils.copyToString(inputStream, StandardCharsets.UTF_8);

    log.info("message body={}",messageBody);

    response.getWriter().write("Ok");

}
Servlet에서 InputStream을 받아와서 Message Body를 읽는다.
@PostMapping("/request-body-string-v2")
public void requestBodyStringV2(InputStream inputStream, Writer responseWriter) throws IOException {
    String messageBody = StreamUtils.copyToString(inputStream, StandardCharsets.UTF_8);
    log.info("message body={}",messageBody);
    responseWriter.write("Ok");
}
Spring MVC를 이용하며 InputStream을 argument으로 받을 수 있다.
HttpEntity
@PostMapping("/request-body-string-v3")
public HttpEntity<String> requestBodyStringV3(HttpEntity<String> httpEntity) throws IOException {
    String messageBody=httpEntity.getBody();
    log.info("message body={}",messageBody);
    return new HttpEntity<>(messageBody);
}
Http Entity를 이용해서 header 나 body 정보를 직접 조회 할 수 있도록 제공해주는 클래스, 이때 내부적으로 HttpMessageConverter을 통해 Http Message Body 정보가 HttpEntity에 담기게 된다.
또한, HttpEntity로 반환하여 Http Response를 만들어 낼 수 있다.
@RequestBody
@ResponseBody
@PostMapping("/request-body-string-v4")
public String requestBodyStringV4(@RequestBody String messageBody) throws IOException {
    log.info("message body={}",messageBody);
    return messageBody ;
}
@RequestBody annotation을 활용해서 Http Message Body를 직접 가져와서 읽을 수 있다.
@RequestBody, @ResponseBody이 사용될 때에는, HttpMessageConverter가 내부적으로 동작해서 Http Message Body와 상호작용한다.
@RequestBody, HttpEntity는 @RequestParam, @ModelAttribute와 전혀 연관성이 없으므로 이들을 오용해서 사용하면 안된다.
JSON Type
이번에는 JSON Type으로 들어오는 데이터에 대한 처리 과정을 알아보자
HelloData Class, ObjectMapper
@Data
public class HelloData {
    private String username;
    private int age;

}

private ObjectMapper objectMapper=new ObjectMapper();
JSON 타입을 특정 객체로 받기 위해 클래스를 지정하고, 객체로 변환하기 위한 ObjectMapper
InputStream
@PostMapping("/request-body-json-v1")
public void requestBodyJsonV1(HttpServletRequest request, HttpServletResponse response) throws IOException {
    ServletInputStream inputStream = request.getInputStream();
    String messageBody = StreamUtils.copyToString(inputStream, StandardCharsets.UTF_8);

    log.info("message body={}", messageBody);
    HelloData helloData = objectMapper.readValue(messageBody, HelloData.class);
    log.info("username={},age={}", helloData.getUsername(), helloData.getAge());
    response.getWriter().write("OK");
}
InputStream으로 읽어들인 Message Body를 Object Mapper을 이용해서 HelloData 객체로 변환하였다.
@RequestBody
@ResponseBody
@PostMapping("/request-body-json-v2")
public String requestBodyJsonV2(@RequestBody String messageBody) throws IOException {
    log.info("message body={}", messageBody);
    HelloData helloData = objectMapper.readValue(messageBody, HelloData.class);
    log.info("username={},age={}", helloData.getUsername(), helloData.getAge());
    return "Ok";
}
InputStream 대신에 @RequestBody를 이용해서 Http Message Body에 접근한다.
@ResponseBody
@PostMapping("/request-body-json-v3")
public String requestBodyJsonV3(@RequestBody HelloData helloData) throws IOException {
    log.info("username={},age={}", helloData.getUsername(), helloData.getAge());
    return "Ok";
}
@RequestBody 인자를 객체로 지정해서 바로 객체로 변환 될 수 있도록 할 수 있다. 이때, 내부적으로 Http Message Converter가 작동한다(정확히는 MappingJackson2HttpMessageConverter이 작동되어 JSON format이 객체로 변환된다.)
@ResponseBody
@PostMapping("/request-body-json-v5")
public HelloData requestBodyJsonV5(@RequestBody HelloData helloData) throws IOException {
    log.info("username={},age={}", helloData.getUsername(), helloData.getAge());
    return helloData;
}
@ResponseBody에 바로 객체를 전달해서 해당 객체를 바로 Http Message Body에 담을 수 있도록 한다.
HttpEntity
@ResponseBody
@PostMapping("/request-body-json-v4")
public String requestBodyJsonV4(HttpEntity<HelloData> httpEntity) throws IOException {
    HelloData helloData=httpEntity.getBody();
    log.info("username={},age={}", helloData.getUsername(), helloData.getAge());
    return "Ok";
}
주의사항
단, @RequestParam, @ModelAttribute 처럼 @RequestBody annotation은 생략할 수 없다. Spring MVC에서는 annotation이 생략된 경우, 기본적으로 기본 타입에 대해서는 @RequestParam를 그 외 나머지는 @ModelAttribute가 적용된다. 위와 같은 경우 @RequestBody를 생략할 경우 @ModelAttribute가 적용되어 정상적으로 작동되지 않는다.
Http Responses
Static Resource
웹브라우져에서 이용되는, HTML,css,js 와 같은 정적 리소스를 응답할 수 있다.
주로 /static, /public, /resources, /META-INF/resources에 있는 정적 리소스를 제공한다.
http://localhost:8080/basic/hello-form.html 이와 같은 요청이 오면 src/main/resources/static/basic/hello-form.html을 그대로 client에게 보여주게 된다.
View Template
뷰 템플릿을 이용해서 동적인 페이지를 작성한다.
src/main/resources/templates의 경로에 동적인 파일들이 담기게 된다.
src/main/resources/templates/response/hello.html
<!DOCTYPE html>
<html xmlns:th="http://www.thymeleaf.org">
<head>
    <meta charset="UTF-8">
    <title>Title</title>
</head>
<body>
<p th:text="${data}">empty</p>
</body>
</html>
위와 같은 동적 html을 만들어 내기 위해 View Resolver을 활용한다.
ModelAndView , Model
@RequestMapping("/response-view-v1")
public ModelAndView responseViewV1(){
    ModelAndView modelAndView = new ModelAndView("response/hello")
            .addObject("data", "hello");
    return modelAndView;
}
ModelAndView에 viewPath을 정의하고, model에 데이터를 추가한다. 이 처럼 ModelAndView 객체를 반환하면 View Resolver가 실행되어 View가 랜더링된다.
RequestMapping("/response-view-v2")
public String responseViewV2(Model model){
    model.addAttribute("data","hello");
    return "response/hello";
}
Spring에서는 @ResponseBody 없이, String을 반환하는 경우 View Resolver가 실행되어 View가 랜더링 된다. Model에는 View로 전달하고자하는 데이터를 담는다.
void
@RequestMapping("/response/hello")
public void responseViewV3(Model model){
    model.addAttribute("data","hello");
}
위와 같이 HttpServletResponse를 활용해서 Http Response를 만들어내는 부분도 없고, 반환형이 void인 경우 요청 url에 근거해서 View Path으로 지정된다.
/response/hello로 요청이 오면 /templates/response/hello.html 파일에 접근하게 되는 것이다.
하지만, 위의 방식은 명시성이 떨어져 권장하지 않는 방식이다.
spring.thymeleaf.prefix=classpath:/templates/
spring.thymeleaf.suffix=.html
ThymeLeafViewResolver의 경우 아래와 같이 prefix, suffix가 지정되어 있어 논리 파일이름을 지정하면 위의 정보를 이용해서 view의 물리적 위치를 만들어낸다.
Http Message Body
HTML이 아닌, Http Message Body에 응답을 넣어야하는 경우가 있다. 보통 HTTP API를 구성할 때 주로 사용하는 방식이다.
String Type
HttpServletResponse
@GetMapping("/response-body-string-v1")
public void responseBodyV1(HttpServletRequest request, HttpServletResponse response) throws IOException {
    response.getWriter().write("OK");
}
ServletResponse 객체를 이용해서 직접 Http Response를 만들어 낼 수 있다.
ResponseEntity
@GetMapping("/response-body-string-v2")
public ResponseEntity<String> responseBodyV2() throws IOException {
    return new ResponseEntity<String>("Ok",HttpStatus.OK);
}
ResponseEntity는 HttpEntity를 상속하고 있으며, Http Response를 만들어 낼 수 있다. 추가로, Http Status Code도 같이 담을 수 있다.
@ResponseBody
@ResponseBody
@GetMapping("/response-body-string-v3")
public String responseBodyV3() throws IOException {
    return "OK";
}
@ResponseBody를 사용하게 되면 View Resolver가 호출되지 않고 바로 Http Message Body에 정보를 기록할 수 있다.
JSON Type
ResponseEntity
@GetMapping("/response-body-json-v1")
public ResponseEntity<HelloData> responseBodyJsonV1() throws IOException {
    HelloData helloData = new HelloData();
    helloData.setUsername("userA");
    helloData.setAge(20);

    return new ResponseEntity<HelloData>(helloData, HttpStatus.OK);
}
ResponseEntity를 이용해서 객체를 바로 Http Message Body를 기록할 수 있다.
@ResponseBody
@ResponseStatus(HttpStatus.OK)
@ResponseBody
@GetMapping("/response-body-json-v2")
public HelloData responseBodyJsonV2()  throws IOException {
    HelloData helloData = new HelloData();
    helloData.setUsername("userA");
    helloData.setAge(20);
    return helloData;
}
@ResponseBody annotation을 지정하고 객체를 반환할 수 있다. 추가로, @ResponseStatus annotation을 이용해서 Http Status Code를 명시할 수 있다.
ResponseEntity, @ResponseBody 사용 시 HttpMessageConverter가 작동한다.
위와 같이 @ResponseBody를 설정한 메소들로만 되어 있는 Controller에 대해서는 @RestController를 클래스 단에 설정하여 메소드 레벨의 @ResponseBody를 생략할 수 있다.
Http Message Converter
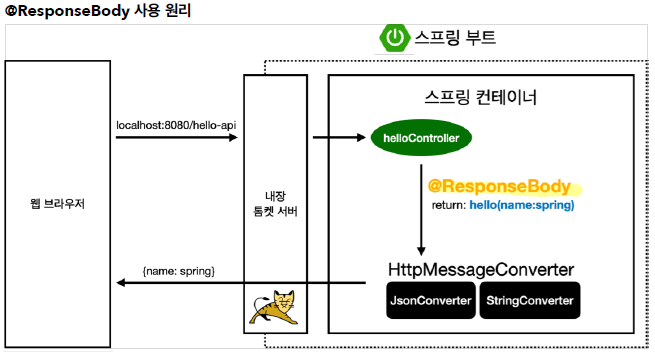
위를 보면 @ResponseBody를 명시하게 되면 Spring 내부적으로 View Resolver를 호출하지 않고, HttpMessageConverter가 호출된다. converter는 Http Message Body에 직접 접근해서 body 내용을 바로 반환할 수 있도록 도와준다.
HttpMessageConverter에도 종류가 있는데, 이는 클래스 타입, Http Access, Http Content-type 정보에 따라 사용되는 Message Converter가 달라진다.
MessageConverter Interface
package org.springframework.http.converter;
public interface HttpMessageConverter<T> {
    boolean canRead(Class<?> clazz, @Nullable MediaType mediaType);
    boolean canWrite(Class<?> clazz, @Nullable MediaType mediaType);
    List<MediaType> getSupportedMediaTypes();


    T read(Class<? extends T> clazz, HttpInputMessage inputMessage) throws IOException HttpMessageNotReadableException;
    void write(T t, @Nullable MediaType contentType, HttpOutputMessage outputMessage) throws IOException, HttpMessageNotWritableException;
}
canRead, canWrite을 이용해서 HTTP Request, Http Response로 사용 가능한지 테스트를 수행 read, write를 통해 request, response 객체 접근
제일 많이 사용되는 HttpMessageConverter은 아래 3가지이다.
- ByteArrayHttpMessageConverter
- StringHttpMessageConverter
- MappingJackson2HttpMessageConverter
ByteArrayHttpMessageConverter
바이트 배열을 처리하는 Converter로 아래의 클래스 타입, 미디어 타입을 지원한다.
- 클래스 타입(@RequestBody): Byte[]
- Content-type: *
- return type(accept): application/octet-stream
StringHttpMessageConverter
String을 처리하기 위한 converter
- 클래스 타입(@RequestBody): String
- Content-type: *
- return type(accept): text/plain
MappingJackson2HttpMessageConverter
JSON 타입을 처리하기 위한 converter
- 클래스 타입(@RequestBody): 객체, HashMap
- Content-type: application/json
- return type(accept): application/json
예제를 통해 어떠한 Converter가 실행되는지 알아보자
//StringHttpMessageConverter
content-type: application/json
@RequestMapping
void hello(@RequetsBody String data) {}

//MappingJackson2HttpMessageConverter
content-type: application/json
@RequestMapping
void hello(@RequetsBody HelloData data) {}

//매칭되는 converter가 존재하지 않는다.
content-type: text/html
@RequestMapping
void hello(@RequetsBody HelloData data) {}
Response Mapping Handler Adapter
그러면 HttpMessageConverter들은 어느 시점에서 호출되어 사용될까?
여터껏, Controller를 이용해서 Request, Reponse를 조작하였다. Spring에서는 @RequestBody, @ReponseBody와 같은 각종 annotation에 대해 처리를 진행한다. 즉, Controller(Handler) 이전에 존재하는 HandlerAdapter라는 존재가 Handler에 이러한 Argument 나 Return Value에 대한 처리를 수행한다. 이를 처리하는 adapter가 바로 requestmappinghandleradapter 이다.
RequestMappingHandlerAdapter
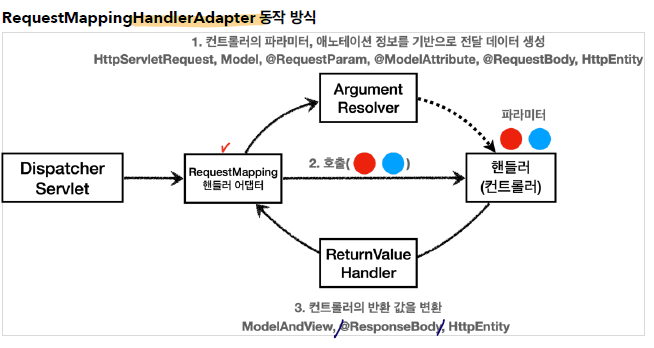
Dispatcher Servlet에 의해서 호출되어 ArgumentResolver, ReturnValue Handler를 호출해서 핸들러를 호출하게 된다.
Argument Resolver
HttpServletRequest, @RequestParam, @ModelAttribute와 같은 다양한 파라미터를 생성해서 controller에 인자로 전달해서 controller에서 해당 인자들을 사용할 수 있게 해주는 것이 바로 argument resolver라는 것이다.
Argument Resolver Interface
public interface HandlerMethodArgumentResolver {
    boolean supportsParameter(MethodParameter parameter);

    @Nullable
    Object resolveArgument(MethodParameter parameter, @Nullable ModelAndViewContainer mavContainer, NativeWebRequest webRequest, @Nullable WebDataBinderFactory binderFactory) throws Exception;
}
supportsParameter를 이용해서 해당 parameter을 처리할 수 있는지 확인하고, resolveArgument을 이용해서 해당 객체를 생성해서 controller에 넘겨준다.
Return Value Handler
controller가 반환하는 다양한 타입에 대한 처리를 수행한다.
ModelAndView, @ResponseBody, HttpEntity와 같은 타입에 대해서 처리해서, View Resolver 호출 또는, MessageConverter 호출을 통한 Http Message Body 작성 등의 작업을 수행한다.
HttpMessageConverter
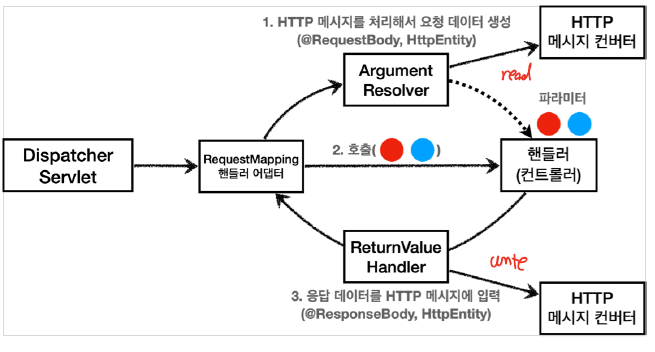
결론적으로, Http Message Converter는 Argument Resolver 와 Return Value Handler에 의해 호출된다.
Argument Resolver
@RequestBody, HttpEntity의 경우 HttpMessageConverter을 호출해서 Http Message Body로 부터 Byte[],String, JSON Type으로 바로 변환할 수 있는 것이다.
Return Value Handler
@ResponseBody, HttpEntity의 경우 HttpMessageConverter을 호출해서 Byte[],String, JSON Type 타입들을 Http Message Body에 바로 작성할 수 있다.
References
link: inflearn
link:springmvc
댓글남기기