
Java Spring MVC part 17
File Upload & Download
Multipart/form-data
기존에는 application/x-www-form-urlencoded 방식으로 Form 데이터를 처리했었다. 하지만, 이는 텍스트 형태의 데이터만 있을 때 가능한 방식이고, 파일과 같이 바이너리 형태의 데이터를 처리하기 위해서는 multipart/form-data 방식을 이용해야한다.
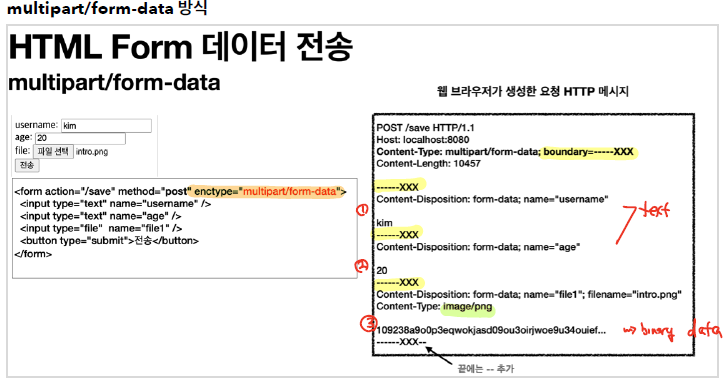
위의 구조를 살펴보면, file 같은 바이너리 형태의 데이터도 정상적으로 HTML Form을 통해 전달할 수 있다. 이때 오른쪽 그림을 보면, boundary로 구분된 여러 개의 part로 구성되어 전달된다. 여러 개의 part을 구성해서 보내는 것을 Multipart/form-data라고 한다.
Servlet 기반의 Multipart 데이터 처리
ServletUploadController
Controller
public class ServletUploadControllerV1 {
    @GetMapping("/upload")
    public String newFile() {
        return "upload-form";
    }

    @PostMapping("/upload")
    public String saveFileV1(HttpServletRequest request) throws ServletException, IOException {
        log.info("request={}", request);

        String itemName = request.getParameter("itemName");
        log.info("itemName={}", itemName);

        Collection<Part> parts = request.getParts();
        log.info("parts={}", parts);
        for (Part part : parts) {
            log.info("content type={}",part.getContentType());
            log.info("fileName={}",part.getSubmittedFileName());
            log.info("content type={}",part.getInputStream());
        }

        return "upload-form";
    }
}
Part 처리
Collection<Part> parts = request.getParts();
각각의 part에 대해서는 request.getParts() 메소드를 이용해서 처리할 수 있다. 해당 Part 객체를 이용해서 part에 포함된 정보에 접근할 수 있따.
Multipart Attributes
- application.properties
spring.servlet.multipart.max-file-size=1MB
spring.servlet.multipart.max-request-size=10MB
spring.servlet.multipart.enabled=false
|Option|Description| |–|–| |multipart.max-file-size|파일 1개의 최대 크기| |multipart.max-request-size|multipart reqeust 하나에 대한 최대 요청 크기(파일의 종합 크기)| |multipart.enabled|멀티파트와 관련된 처리를 할지 여부, 기본값은 true. false로 지정하게 되면 request.getParts()와 같이 멀티파트 객체와 관련된 메소드를 활용할 수 없다.|
multipart.enabled는 기본값이 true로 설정되어 있어, Multipart 객체가 들어오는 경우 MultipartResolver가 실행되어, HttpServletRequest를 MultipartHttpServletRequest 형태로 변환해서 인자로 전달하게 된다. 따라서, controller의 인자로 MultipartHttpServletRequest 객체 형태로 전달받아서, Multipart에 대한 처리를 진행할 수도 있지만, 보통은 MultipartFile 객체를 이용해서 처리한다.
Uploading File
application.properties
file.dir=E:/Codes/Spring-Framework3/upload/upload_destination/
파일을 업로드할 폴더 경로를 지정해놓자
Controller
public class ServletUploadControllerV2 {
    @Value("${file.dir}")
    private String fileDir;

    @GetMapping("/upload")
    public String newFile() {
        return "upload-form";
    }

    @PostMapping("/upload")
    public String saveFileV1(HttpServletRequest request) throws ServletException, IOException {
        log.info("request={}", request);

        String itemName = request.getParameter("itemName");
        log.info("itemName={}", itemName);

        Collection<Part> parts = request.getParts();
        log.info("parts={}", parts);
        for (Part part : parts) {
            log.info("-----Part-----");
            log.info("name={}", part.getName());
            Collection<String> headerNames = part.getHeaderNames();
            for (String headerName : headerNames) {
                log.info("header {} : {}", headerName, part.getHeader(headerName));
            }
            log.info("fileName={}",part.getSubmittedFileName());
            log.info("size={}", part.getSize());

            InputStream inputStream = part.getInputStream();
            String body = StreamUtils.copyToString(inputStream, StandardCharsets.UTF_8);
            //log.info("body={}", body);

            if (StringUtils.hasText(part.getSubmittedFileName())) {
                String fullPath = fileDir + part.getSubmittedFileName();
                log.info("파일 저장 fullpath:{}", fullPath);
                part.write(fullPath);
            }
        }
        return "upload-form";
    }
}
Application properties variable access
@Value("${file.dir}")
//파일을 저장할 폴더의 경로
private String fileDir;
@Value annotation을 이용해서 application.properties에 생성한 변수 값을 가져올 수 있다.
Part 객체를 통한 파일 업로드 수행
Collection<Part> parts = request.getParts();
for (Part part : parts) {
    //part의 InputStream을 이용해서 파일의 데이터를 읽어들일 수 있다.
    InputStream inputStream = part.getInputStream();
    String body = StreamUtils.copyToString(inputStream, StandardCharsets.UTF_8);

    //만약 등록된 파일(submittedFileName)이 있는 경우
    if (StringUtils.hasText(part.getSubmittedFileName())) {
        //파일을 저장할 경로를 지정해서
        String fullPath = fileDir + part.getSubmittedFileName();
        //part.write()를 통해 해당 경로에 파일을 저장할 수 있다.
        part.write(fullPath);
    }
}
Spring 기반의 Multipart 데이터 처리
public class SpringUploadController {
    @Value("${file.dir}")
    private String fileDir;

    @GetMapping("/upload")
    public String newFile() {
        return "upload-form";
    }

    @PostMapping("/upload")
    public String saveFileV1(@RequestParam String itemName, @RequestParam MultipartFile file, HttpServletRequest request) throws IOException {
        log.info("request={}", request);
        log.info("itemName={}", itemName);
        log.info("multipartFile={}", file);

        //파일이 비어 있지 않다면
        if (!file.isEmpty()) {
            //파일의 저장경로를 지정해서
            String fullPath = fileDir + file.getOriginalFilename();
            log.info("fullPath: {}", fullPath);
            //업로드한 파일을 해당 경로에 저장할 수 있다.
            file.transferTo(new File(fullPath));
        }
        return "upload-form";
    }
}
Spring 에서는 Multipart 데이터에 대한 처리를 용이하기 위해 MultipartFile 객체를 제공한다.
예제를 통한 파일 업로드, 다운로드
Domain
UploadFile Class
@Data
public class UploadFile {
    private String uploadFileName;
    private String storeFileName;

    public UploadFile(String uploadFileName, String storeFileName) {
        this.uploadFileName = uploadFileName;
        this.storeFileName = storeFileName;
    }
}
클라이언트가 업로드하는 파일의 이름은 겹칠 수 있지만, 서버에 저장되는 파일의 이름은 겹쳐서는 안된다. 따라서 위와 같이 클래스를 정의해서 업로드한 파일 이름과 서버에 저장된 파일의 이름을 구분해서 관리할 수 있도록 한다.
FileStore Class
@Component
@Slf4j
public class FileStore {
    @Value("${file.dir}")
    private String fileDir;

    public String getFullPath(String fileName) {
        return fileDir + fileName;
    }

    public List<UploadFile> storeFiles(List<MultipartFile> multipartFiles) throws IOException {
        List<UploadFile> storedFileList = new ArrayList<>();
        for (MultipartFile multipartFile : multipartFiles) {
            if (!multipartFile.isEmpty()) {
                storedFileList.add(storeFile(multipartFile));
            }
        }
        return storedFileList;
    }

    public UploadFile storeFile(MultipartFile multipartFile) throws IOException {
        if (multipartFile.isEmpty()) {
            return null;
        }
        String originalFilename = multipartFile.getOriginalFilename();
        String storeFileName = createStoreFileName(originalFilename);
        log.info("fullpath:{}", getFullPath(storeFileName));
        multipartFile.transferTo(new File(getFullPath(storeFileName)));
        return new UploadFile(originalFilename,storeFileName);
    }

    private String createStoreFileName(String originalFileName) {
        String ext = extractExt(originalFileName);
        String uuid = UUID.randomUUID().toString();
        return uuid + "." + ext;
    }
    private String extractExt(String originalFileName){
        int index = originalFileName.lastIndexOf(".");
        return originalFileName.substring(index + 1);
    }
}
파일 이름 생성, 서버 저장, 등의 기능을 수행하는 데 특화된 FileStore 클래스를 생성해서 Component로 관리한다. 나중에 파일 저장 기능을 수행해야하는 곳에 Component을 주입받아서 이용가능하다.
createStoreFileName()
private String createStoreFileName(String originalFileName) {
    String ext = extractExt(originalFileName);
    String uuid = UUID.randomUUID().toString();
    return uuid + "." + ext;
}
서버에 저장되는 파일의 이름은 중복되면 안되기 때문에, UUID을 이용해서 랜덤한 값을 생성해서 할당한다.
extractExt()
private String extractExt(String originalFileName){
    int index = originalFileName.lastIndexOf(".");
    return originalFileName.substring(index + 1);
}
파일의 확장자를 추출하는 메소드를 지정한다.
storeFile
public UploadFile storeFile(MultipartFile multipartFile) throws IOException {
    if (multipartFile.isEmpty()) {
        return null;
    }
    //getOriginalFileName()을 이용해서 업로드한 파일 이름을 알아낸다.
    String originalFilename = multipartFile.getOriginalFilename();
    //해당 파일 이름에 대한 서버 저장용 파일 이름을 생성한다.
    String storeFileName = createStoreFileName(originalFilename);
    log.info("fullpath:{}", getFullPath(storeFileName));
    //생성된 서버 파일 이름으로 파일을 지정한 경로에 저장한다.
    multipartFile.transferTo(new File(getFullPath(storeFileName)));
    return new UploadFile(originalFilename,storeFileName);
}
실제로 파일 업로드를 수행하는 부분이다.
한번에 여러 개의 파일을 저장하기 위한 storeFiles 메소드도 구현해 놓는 것이 좋다.
Controller
ResponseBody
@ResponseBody
@GetMapping("images/{filename}")
public Resource downLoadImage(@PathVariable String filename) throws MalformedURLException {
    return new UrlResource("file:" + fileStore.getFullPath(filename));
}
UrlResource를 이용해서 특정 경로 내에 존재하는 파일을 읽어서 @ResponseBody로 해당 파일의 정보를 출력한다.
ResponseEntity<Resource>
@GetMapping("attach/{itemId}")
public ResponseEntity<Resource> downloadAttach(@PathVariable Long itemId) throws MalformedURLException {
    Item item = itemRepository.findById(itemId);
    String storeFileName = item.getAttachFile().getStoreFileName();
    String uploadFileName = item.getAttachFile().getUploadFileName();

    UrlResource urlResource = new UrlResource("file:" + fileStore.getFullPath(storeFileName));
    //파일 이름이 한글인 경우에 대해 인코딩을 처리한다.
    String encodedUploadFileName = UriUtils.encode(uploadFileName, StandardCharsets.UTF_8);
    //content disposition에 attachment, filename을 지정해서 해당 파일을 다운로드할 수 있도록 한다.
    String contentDisposition = "attachment;filename=\"" + encodedUploadFileName + "\"";
    return ResponseEntity.ok()
            .header(HttpHeaders.CONTENT_DISPOSITION,contentDisposition)
            .body(urlResource);
}
위와 같이 ContentDisposition에 attachment, filename을 추가해서 ResponseEntity에 지정하게 되면, 해당 컨트롤러로의 요청이 왔을 때, 해당 파일을 다운로드 하는 것이 가능하다.
View
form
<form th:action method="post" enctype="multipart/form-data">
    <ul>
      <li>상품명 <input type="text" name="itemName"></li>
      <li>첨부파일<input type="file" name="attachFile" ></li>
      <li>이미지 파일들<input type="file" multiple="multiple"
                        name="imageFiles" ></li>
    </ul>
    <input type="submit"/>
  </form>
multiple 속성을 설정하면 한번에 여러개의 파일을 업로드하는 것이 가능하다.
view
<div class="container">
    <div class="py-5 text-center">
        <h2>상품 조회</h2>
    </div>
    상품명: <span th:text="${item.itemName}">상품명</span><br/>
    첨부파일: <a th:if="${item.attachFile}" th:href="|/attach/${item.id}|" th:text="${item.getAttachFile().getUploadFileName()}" /><br/>
    <img th:each="imageFile : ${item.imageFiles}" th:src="|/images/${imageFile.getStoreFileName()}|" width="300" height="300"/>
</div>
첨부파일을 <a> 태그를 이용해서 링크로 설정해서, 해당 링크를 클릭했을 때, 컨트롤러로 요청이 가고 해당 컨트롤러에서는 파일이 다운로드 될 수 있도록 처리한다.
각각의 이미지 파일에 대해서는 th:src에 지정된 경로에 따라 컨트롤러가 실행되며, UrlResource를 받아서 image를 출력하게 된다.
References
link: inflearn
link:springmvc
댓글남기기