
Java Spring Advanced part 6
Spring Proxy
ProxyFactory & Advice
ProxyFactory
경우에 따라서 JDK Proxy, CGLIB 방식을 혼용해서 사용하고자 하는 경우 어떻게 해야될까? 이럴 때, Spring에서는 ProxyFactory 개념을 이용해서 이들을 혼용해서 사용할 수 있도록 지원해준다.
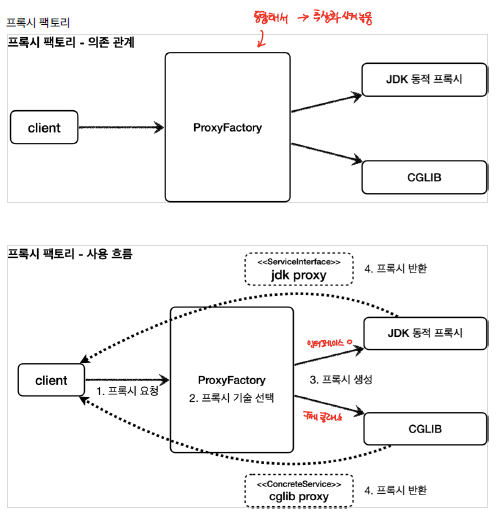
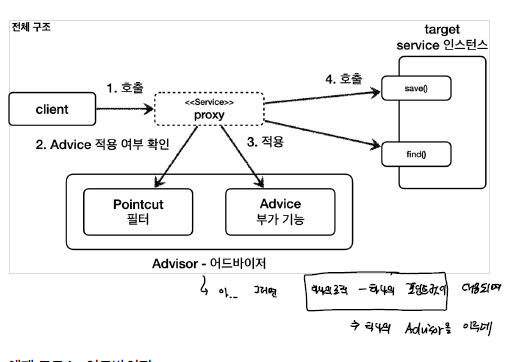
ProxyFactory를 이용하게 되면, 내부적으로 interface 이면 JDK Proxy를, Concrete Class이면 CGLIB 형태로 프록시를 구성할 수 있도록 할 수 있다. 추가로, 인터페이스로 되어 있더 하더라도, CGLIB로 구성하고자 하는 경우도 가능하다.
Advice
위와 같이, ProxyFactory를 이용해서 원하는 방식으로 프록시를 구성할 수 있게 되었다. 이전 강의에서도 보았듯이, JDK 프록시는 InvocationHandler CGLIB는 MethodInterceptor를 로직으로 활용하게 된다. 그러면 우리는 이 두개를 따로 구현해야될까??
Spring에서는 이 둘을 추상화한 개념인 Advice를 제공한다. 아래의 그림을 보게 되면, InvocationHandler, MethodInterceptor가 Advice를 호출하게 되는 것을 확인할 수 있다. 즉, 어떠한 proxy 타입에 구애받지 않고 공통 로직을 구성할 수 있게 되는 것이다.

이렇게 되면, 개발자는 ProxyFactory 와 Advice를 이용해서 Proxy를 구축할 수 있게 되었다.
Practice
TimeAdvice
다음과 같이 실행시간을 측정하는 Advice를 생성한다.
@Slf4j
public class TimeAdvice implements MethodInterceptor {
    @Override
    public Object invoke(MethodInvocation invocation) throws Throwable {
        log.info("TimeProxy 실행");
        Long startTime = System.currentTimeMillis();

        Object result = invocation.proceed();

        Long endTime = System.currentTimeMillis();

        Long resultTime = endTime - startTime;
        log.info("TimeProxy 종료 resultTime={}", resultTime);
        return result;
    }
}
기존의 로직과 달리, Target 변수, Method 정보, 등을 전달하지 않는데, 이는 MethodInvocation 객체 내부에 다 포함되어 있기 때문이다. ProxyFactory 객체를 이용해서 프록시를 생성하는 과정에서 필요한 매개변수가 넘어가게 된다.
JDK Proxy
@Test
@DisplayName("인터페이스가 있으면 JDK 프록시 사용")
void interfaceProxy() {
    ServiceInterface target = new ServiceImpl();
    ProxyFactory proxyFactory = new ProxyFactory(target);
    proxyFactory.addAdvice(new TimeAdvice()); //advice 지정
    ServiceInterface proxy = (ServiceInterface) proxyFactory.getProxy();

    log.info("target-Class: {}", target.getClass());
    log.info("proxy-Class: {}", proxy.getClass());
    proxy.save();

    assertThat(AopUtils.isAopProxy(proxy)).isTrue();
    assertThat(AopUtils.isJdkDynamicProxy(proxy)).isTrue();
    assertThat(AopUtils.isCglibProxy(proxy)).isFalse();
}
AopUtils 모듈을 이용해서 프록시 관련 메소드 검증을 진행할 수 있다.
Results
ProxyFactoryTest - targetClass=class hello.proxy.common.service.ServiceImpl
ProxyFactoryTest - proxyClass=class com.sun.proxy.$Proxy13
TimeAdvice - TimeProxy 실행
ServiceImpl - save 호출
TimeAdvice - TimeProxy 종료 resultTime=1ms
interface 형태로 제공했을 때, JDK Proxy 형태로 proxy를 구성하는 것을 확인할 수 있다.
CGLIB
@Test
@DisplayName("구체클래스가 있으면 CGLIB 사용")
void concreteProxy() {
    ConcreteService target = new ConcreteService();
    ProxyFactory proxyFactory = new ProxyFactory(target);
    proxyFactory.addAdvice(new TimeAdvice());
    ConcreteService proxy = (ConcreteService) proxyFactory.getProxy();

    log.info("target-Class: {}", target.getClass());
    log.info("proxy-Class: {}", proxy.getClass());

    proxy.call();

    assertThat(AopUtils.isAopProxy(proxy)).isTrue();
    assertThat(AopUtils.isJdkDynamicProxy(proxy)).isFalse();
    assertThat(AopUtils.isCglibProxy(proxy)).isTrue();
}
Results
ProxyFactoryTest - targetClass=class hello.proxy.common.service.ConcreteService
ProxyFactoryTest - proxyClass=class hello.proxy.common.service.ConcreteService$
$EnhancerBySpringCGLIB$$103821ba
TimeAdvice - TimeProxy 실행
ConcreteService - ConcreteService 호출
TimeAdvice - TimeProxy 종료 resultTime=1ms
구체 클래스로 제공했을 때는, CGLIB 방식으로 프록시를 구성하는 것을 확인할 수 있다.
ProxyTargetClass
@Test
@DisplayName("ProxyTargetClass를 이용하면, interface가 존재하더라도, CGLIB를 사용")
void proxyTargetClass() {
    ServiceInterface target = new ServiceImpl();
    ProxyFactory proxyFactory = new ProxyFactory(target);
    proxyFactory.setProxyTargetClass(true);
    proxyFactory.addAdvice(new TimeAdvice());
    ServiceInterface proxy = (ServiceInterface) proxyFactory.getProxy();

    log.info("target-Class: {}", target.getClass());
    log.info("proxy-Class: {}", proxy.getClass());
    proxy.save();

    assertThat(AopUtils.isAopProxy(proxy)).isTrue();
    assertThat(AopUtils.isJdkDynamicProxy(proxy)).isFalse();
    assertThat(AopUtils.isCglibProxy(proxy)).isTrue();
}
Results
ProxyFactoryTest - targetClass=class hello.proxy.common.service.ServiceImpl
ProxyFactoryTest - proxyClass=class hello.proxy.common.service.ServiceImpl$
$EnhancerBySpringCGLIB$$2bbf51ab
TimeAdvice - TimeProxy 실행
ServiceImpl - save 호출
TimeAdvice - TimeProxy 종료 resultTime=1ms
proxyTargetClass를 true로 설정하게 되면 인터페이스를 통한 프록시 구성에도 CGLIB 방식으로 프록시를 구성하도록 설정할 수 있다.
PointCut, Advice, Advisor
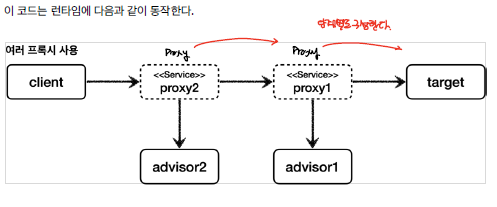
SpringAOP를 구성하는 3가지 component이다.
PointCut
특정 부가 기능을 어디에 적용할 지 여부를 판단할 수 있는 로직이다. 즉, 필터링 기능을 제공하는 것이다.
Advice
프록시에서 호출할 수 있는 부가기능이다. –> 프록시가 수행하게 되는 로직이다.
Advisor
Advice + PointCut을 하나씩 가지고 있게 된다. advisor를 통해 부가기능을 어디에 어떻게 적용하게 될지 여부를 알 수 있게 되는 것으로 부가 기능 하나에 대해서 Advisor로 관리하게 된다.
Advisor 구성
@Test
void advisorTest1(){
    ServiceInterface target = new ServiceImpl();
    ProxyFactory proxyFactory = new ProxyFactory(target);
    DefaultPointcutAdvisor advisor = new DefaultPointcutAdvisor(Pointcut.TRUE, new TimeAdvice());
    proxyFactory.addAdvisor(advisor);

    ServiceInterface proxy = (ServiceInterface) proxyFactory.getProxy();
    proxy.save();
    proxy.find();

}
PointCut을 True로 한 advice를 advisor로 등록하게 되면, 모든 메소드에 대해서 advice를 실행하게 된다.
PointCut 구성
static class MyPointCut implements Pointcut {
    @Override
    public ClassFilter getClassFilter() {
        return ClassFilter.TRUE;
    }

    @Override
    public MethodMatcher getMethodMatcher() {
        return new MyMethodMatcher();
    }
}

@Slf4j
static class MyMethodMatcher implements MethodMatcher {
    @Override
    public boolean matches(Method method, Class<?> targetClass) {
        log.info("포인트컷 호출, method:{}, targetClass:{}",method.getName(),targetClass);
        boolean result = PatternMatchUtils.simpleMatch("save", method.getName());
        log.info("matches result: {}", result);

        return result;
    }

    @Override
    public boolean isRuntime() {
        return false;
    }

    @Override
    public boolean matches(Method method, Class<?> targetClass, Object... args) {
        return false;
    }
}
@Test
@DisplayName("직접 만든 포인트컷")
void advisorTest2(){
    ServiceInterface target = new ServiceImpl();
    ProxyFactory proxyFactory = new ProxyFactory(target);
    DefaultPointcutAdvisor advisor = new DefaultPointcutAdvisor(new MyPointCut(), new TimeAdvice());

    proxyFactory.addAdvisor(advisor);

    ServiceInterface proxy = (ServiceInterface) proxyFactory.getProxy();
    proxy.save();
    proxy.find();

}
위와 같이 직접 PointCut를 구성해서, advisor에 적용할 수 있지만, 보통 아래와 같이 Spring이 제공하는 pointcut을 이용하게 된다.
@Test
@DisplayName("스프링이 제공하는 포인트컷")
void advisorTest3(){
    ServiceInterface target = new ServiceImpl();
    ProxyFactory proxyFactory = new ProxyFactory(target);
    NameMatchMethodPointcut pointcut = new NameMatchMethodPointcut();
    pointcut.setMappedName("save");
    DefaultPointcutAdvisor advisor = new DefaultPointcutAdvisor(pointcut, new TimeAdvice());

    proxyFactory.addAdvisor(advisor);

    ServiceInterface proxy = (ServiceInterface) proxyFactory.getProxy();
    proxy.save();
    proxy.find();

}
pointcut을 구성해서, save 메소드 호출의 경우에 대해서만 로그를 출력하겠다고, pointcut으로 필터링을 진행한다. 그러면 아래와 로그 출력 결과와 같이 save 메소드에 대해서는 로그가 출력되며, find 메소드에는 로그가 출력되지 않는 것을 확인할 수 있다.
#save() 호출
TimeAdvice - TimeProxy 실행
ServiceImpl - save 호출
TimeAdvice - TimeProxy 종료 resultTime=1ms
#find() 호출
ServiceImpl - find 호출
Spring이 제공해주는 PointCut에는 NameMathMethodPointCut 이외에도,JdkRegexpMethodPointcut, TruePointcut, AnnotationMatchingPointcut, AspectJExpressionPointcut 등이 있다.
Multi Advisor
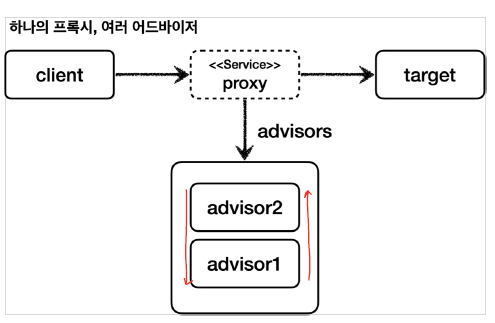
여러개의 부가 기능을 적용하려고 하면 어떻게 해야될까?
생각해 볼 수 있는 것이, 여러개의 프록시를 구성해서 각각 부가기능을 수행하도록 하면 될 것 같다고 생각할 것이다.
Advices
@Slf4j
static class Advice1 implements MethodInterceptor {
    @Override
    public Object invoke(MethodInvocation invocation) throws Throwable {
        log.info("Advice 1");
        return invocation.proceed();
    }
}
@Slf4j
static class Advice2 implements MethodInterceptor {
    @Override
    public Object invoke(MethodInvocation invocation) throws Throwable {
        log.info("Advice 2");
        return invocation.proceed();
    }
}
Multi Proxy
@Test
@DisplayName("여러 개의 프록시")
void multiAdvisorTest1() {
    ServiceInterface target = new ServiceImpl();

    ProxyFactory proxyFactory = new ProxyFactory(target);
    DefaultPointcutAdvisor advisor = new DefaultPointcutAdvisor(Pointcut.TRUE, new Advice1());
    proxyFactory.addAdvisor(advisor);
    ServiceInterface proxy1 = (ServiceInterface) proxyFactory.getProxy();

    ProxyFactory proxyFactory2 = new ProxyFactory(proxy1);
    DefaultPointcutAdvisor advisor2 = new DefaultPointcutAdvisor(Pointcut.TRUE, new Advice2());
    proxyFactory2.addAdvisor(advisor2);
    ServiceInterface proxy2 = (ServiceInterface) proxyFactory2.getProxy();

    proxy2.save();
    proxy2.find();
}
Multi Advisor
하지만, 위와 같은 경우 너무 많은 프록시가 생성되게 된다. 다행히, Spring은 한개의 proxy에 대해 여러 개의 advisor을 적용할 수 있도록 제공한다.
@Test
@DisplayName("하나의 프록시, 여러 어드바이저")
void multiAdvisorTest2() {
    ServiceInterface target = new ServiceImpl();
    ProxyFactory proxyFactory = new ProxyFactory(target);

    DefaultPointcutAdvisor advisor = new DefaultPointcutAdvisor(Pointcut.TRUE, new Advice1());
    DefaultPointcutAdvisor advisor2 = new DefaultPointcutAdvisor(Pointcut.TRUE, new Advice2());
    proxyFactory.addAdvisor(advisor2);
    proxyFactory.addAdvisor(advisor);

    ServiceInterface proxy = (ServiceInterface) proxyFactory.getProxy();

    proxy.save();
    proxy.find();
}
단, advisor를 등록할 때, 등록한 순서대로 적용하게 되니 주의하자.
기존의 controller, service, repository에 ProxyFactory 적용
LogTrace Advice
@Slf4j
public class LogTraceAdvice implements MethodInterceptor {
    private final LogTrace logTrace;

    public LogTraceAdvice(LogTrace logTrace) {
        this.logTrace = logTrace;
    }

    @Override
    public Object invoke(MethodInvocation invocation) throws Throwable {
        TraceStatus status = null;

        try {
            Method method = invocation.getMethod();
            String message = method.getDeclaringClass().getSimpleName() + "." + method.getName();

            status = logTrace.begin(message);
            Object result = invocation.proceed();
            logTrace.end(status);

            return result;
        } catch (Exception e) {
            logTrace.exception(status, e);
            throw e;
        }
    }
}
V1(Interface 기반)
@Slf4j
@Configuration
public class ProxyFactoryConfigV1 {
    @Bean
    public OrderControllerV1 orderController(LogTrace trace) {
        OrderControllerV1 orderControllerImpl = new OrderControllerV1Impl(orderService(trace));
        ProxyFactory proxyFactory = new ProxyFactory(orderControllerImpl);
        proxyFactory.addAdvisor(getAdvisor(trace));
        OrderControllerV1 proxy = (OrderControllerV1) proxyFactory.getProxy();
        log.info("ProxyFactory proxy={}, target={}", proxy.getClass(), orderControllerImpl.getClass());
        return proxy;
    }

    @Bean
    public OrderServiceV1 orderService(LogTrace trace) {
        OrderServiceV1 orderServiceImpl = new OrderServiceV1Impl(orderRepository(trace));
        ProxyFactory proxyFactory = new ProxyFactory(orderServiceImpl);
        proxyFactory.addAdvisor(getAdvisor(trace));
        OrderServiceV1 proxy = (OrderServiceV1) proxyFactory.getProxy();
        log.info("ProxyFactory proxy={}, target={}", proxy.getClass(), orderServiceImpl.getClass());
        return proxy;
    }

    @Bean
    public OrderRepositoryV1 orderRepository(LogTrace trace) {
        OrderRepositoryV1 orderRepositoryImpl = new OrderRepositoryV1Impl();
        ProxyFactory proxyFactory = new ProxyFactory(orderRepositoryImpl);
        proxyFactory.addAdvisor(getAdvisor(trace));
        OrderRepositoryV1 proxy = (OrderRepositoryV1) proxyFactory.getProxy();
        log.info("ProxyFactory proxy={}, target={}", proxy.getClass(), orderRepositoryImpl.getClass());
        return proxy;
    }

    //아래의 메소드에 대한 호출이 진행될 때에만 로그를 생성한다.
    private Advisor getAdvisor(LogTrace logTrace) {
        NameMatchMethodPointcut pointcut = new NameMatchMethodPointcut();
        pointcut.setMappedNames("request*", "order*", "save*");

        LogTraceAdvice advice = new LogTraceAdvice(logTrace);

        return new DefaultPointcutAdvisor(pointcut, advice);

    }

}
V2(concrete class 기반)
public class ProxyFactoryConfigV2 {
    @Bean
    public OrderControllerV2 orderController(LogTrace trace) {
        OrderControllerV2 orderControllerImpl = new OrderControllerV2(orderService(trace));
        ProxyFactory proxyFactory = new ProxyFactory(orderControllerImpl);
        proxyFactory.addAdvisor(getAdvisor(trace));
        OrderControllerV2 proxy = (OrderControllerV2) proxyFactory.getProxy();
        log.info("ProxyFactory proxy={}, target={}", proxy.getClass(), orderControllerImpl.getClass());
        return proxy;
    }

    @Bean
    public OrderServiceV2 orderService(LogTrace trace) {
        OrderServiceV2 orderServiceImpl = new OrderServiceV2(orderRepository(trace));
        ProxyFactory proxyFactory = new ProxyFactory(orderServiceImpl);
        proxyFactory.addAdvisor(getAdvisor(trace));
        OrderServiceV2 proxy = (OrderServiceV2) proxyFactory.getProxy();
        log.info("ProxyFactory proxy={}, target={}", proxy.getClass(), orderServiceImpl.getClass());
        return proxy;
    }

    @Bean
    public OrderRepositoryV2 orderRepository(LogTrace trace) {
        OrderRepositoryV2 orderRepositoryImpl = new OrderRepositoryV2();
        ProxyFactory proxyFactory = new ProxyFactory(orderRepositoryImpl);
        proxyFactory.addAdvisor(getAdvisor(trace));
        OrderRepositoryV2 proxy = (OrderRepositoryV2) proxyFactory.getProxy();
        log.info("ProxyFactory proxy={}, target={}", proxy.getClass(), orderRepositoryImpl.getClass());
        return proxy;
    }

    private Advisor getAdvisor(LogTrace logTrace) {
        NameMatchMethodPointcut pointcut = new NameMatchMethodPointcut();
        pointcut.setMappedNames("request*", "order*", "save*");

        LogTraceAdvice advice = new LogTraceAdvice(logTrace);

        return new DefaultPointcutAdvisor(pointcut, advice);

    }

}
Limits
여기서 나타는 단점이 몇가지 있다.
-
우선, V1,V2 config와 같이 설정파일이 많이 생성되게 된다. 위의 코드를 보면 알듯이 각각의 Spring Bean에 대해서 프록시 구성 코드를 작성하게 되는데, 만약 Spring Bean 갯수 100개가 되면 설정도 100개가 요구된다.
-
Component Scan이 되는 controller, service, repository의 경우 자동으로 Spring bean으로 등록되기 때문에, 위와 같은 방법으로는 proxy를 구성할 수 없다.
이 두개의 문제를 해결하는 것이 Bean Postprocessing 개념이다.
References
link: inflearn
link:spring_advanced
댓글남기기