
Java Spring Advanced part 3
Design Patterns
ThreadLocal, Request scope 기반으로 Log Tracer을 구현하므로써 Spring Bean으로 관리하게 되었다. 이렇게 하면서 parameter 전파 없이도 Transaction Id, Method level을 관리할 수 있었다.
private final LogTrace tracer;

@GetMapping("/v3/request")

public String request(String itemId) {

    TraceStatus begin = null;
    try {
        begin = tracer.begin("orderController.request()");
        orderService.orderItem(itemId);
        tracer.end(begin);

    } catch (Exception exception) {
        tracer.exception(begin, exception);
        throw exception;
    }
    return "ok";
}
하지만, 위와 같이 Field 형태로 활용하게 되더라도 여전히 코드를 많이 수정(추가)해야되는 부분이 존재한다.
try-catch 구문이 중복해서 쓰이게 되고, 매 호출마다, begin-end 혹은 begin-exception 형태로 메소드를 호출해야되는 문제가 있다.
위의 코드를 살펴 보게 되면, 핵심 기능인 orderService 와 부가 기능인 로그 기능이 혼합되어 있다.
이렇게 혼합되어 있는 형태의 코드 경우 유지보수의 단점이 있다.
그래서, 우선적으로 변하는 부분과 변하지 않는 부분으로 분리해서 생각해야된다.
위에서 변하는 부분은 핵심 기능이고, 변하지 않는 부분은 로그 출력 기능이다. 변하지 않는 부분에 대해 Template로 생성해서 관리하게 되면 훨씬 효율적으로 코드를 작성할 수 있다.
Template Method
Practice
@Test
void templateMethodV0() {
    logic1();
    logic2();
}

public void logic1() {
    Long startTime = System.currentTimeMillis();
    //비즈니스 로직 시작
    log.info("비즈니스 로직 1 시작");
    //비즈니스 로직 종료
    Long endTime = System.currentTimeMillis();
    long resultTime = endTime - startTime;
    log.info("resultTime: {}", resultTime);
}

public void logic2() {
    Long startTime = System.currentTimeMillis();
    //비즈니스 로직 시작
    log.info("비즈니스 로직 2 시작");
    //비즈니스 로직 종료
    Long endTime = System.currentTimeMillis();
    long resultTime = endTime - startTime;
    log.info("resultTime: {}", resultTime);
}
위와 같은 코드가 있다고 가정하자, 각각의 로직의 경우 시간을 측정하는 부가 기능 부분과 핵심 기능이 섞여 있는 상태이다.
그래서 여기서 시간을 측정하는 부분을 template로 분리해서 생각해보자
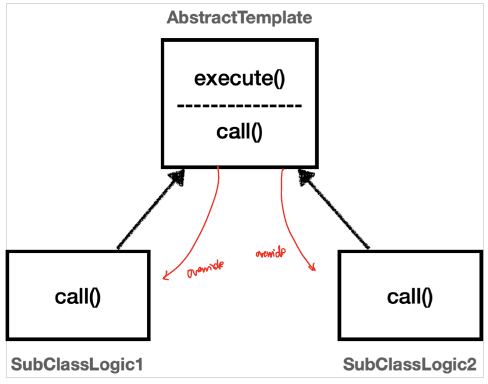
Abstract Template Class
public abstract class AbstractTemplate {
    public void execute(){
        Long startTime = System.currentTimeMillis();
        //비즈니스 로직 시작
        call();
        //비즈니스 로직 종료
        Long endTime = System.currentTimeMillis();
        long resultTime = endTime - startTime;
        log.info("resultTime: {}", resultTime);
    }

    protected abstract void call();
}
즉 위와 같이 template을 부모 클래스로 생각해서 관리하도록 한다. 템플릿에는 실행 시간을 측정하는 부분이 구현되어 있고, 각각의 핵심 기능의 경우 해당 Abstarct Template class을 상속받아서, call 함수를 오버라이딩 하므로써 핵심기능을 구현한다.
이렇게 하면, 시간을 측정하는 부가 기능에 대해서는 고려 할 필요 없이, 오로지 핵심 기능만 재정의하면 된다.
그러면 위의 코드는 아래와 같은 형태로 변환할 수 있다.
SubLogic class
@Slf4j
public class SubClassLogic1 extends AbstractTemplate{
    @Override
    protected void call() {
        log.info("비즈니스 로직 1 실행");
    }
}
Test
@Test
void templateMethodV1(){
    AbstractTemplate abstractTemplate1 = new SubClassLogic1();
    abstractTemplate1.execute();

    AbstractTemplate abstractTemplate2 = new SubClassLogic2();
    abstractTemplate2.execute();

}
해당 코드를 익명 내부 클래스를 이용하면 조금 더 효율적으로 생성할 수 있다.
@Test
void templateMethodV2() {

    AbstractTemplate template1 = new AbstractTemplate() {
        @Override
        protected void call() {
            log.info("비즈니스 로직1 실행");
        }
    };
    template1.execute();

    AbstractTemplate template2 = new AbstractTemplate() {
        @Override
        protected void call() {
            log.info("비즈니스 로직1 실행");
        }
    };
    template2.execute();
}
Template Method 적용
Template Method 방식을 controller, service, repository에 적용해보자
Abstract Template Class
public abstract class AbstractTemplate<T> {
    private final LogTrace trace;

    public AbstractTemplate(LogTrace trace) {
        this.trace = trace;
    }

    public T execute(String message){
        TraceStatus traceStatus = null;
        try {
            traceStatus = trace.begin(message);

            T result = call();

            trace.end(traceStatus);
            return result;
        }catch(Exception e){
            trace.exception(traceStatus, e);
            throw e;
        }
    }

    public abstract T call();
}
Generic을 통해 다양한 반환 타입을 처리할 수 있도록 한다.
Controller
public class OrderControllerV4 {
    private final OrderServiceV4 orderService;
    private final LogTrace tracer;


    @GetMapping("/v4/request")

    public String request(String itemId) {
        AbstractTemplate<String> template=new AbstractTemplate<String>(tracer) {
            @Override
            public String call() {
                orderService.orderItem(itemId);
                return "ok";
            }
        };
        return template.execute("orderController.request()");
    }

}
Service
public class OrderServiceV4 {
    private final OrderRepositoryV4 orderRepository;
    private final LogTrace tracer;
    public void orderItem(String itemId) {
        AbstractTemplate<Void> template=new AbstractTemplate<Void>(tracer) {
            @Override
            public Void call() {
                orderRepository.save(itemId);
                return null;
            }
        };
        template.execute("OrderService.save()");
    }

}
void와 같은 자바 기본형을 Generic type으로 설정할 수 없기 때문에, Void Wrapper 타입을 활용한다. 대신, return null을 활용해서 null값을 반환해야한다.
Repository
public class OrderRepositoryV4 {
    private final LogTrace tracer;
    public void save(String itemId) {
        AbstractTemplate<Void> template = new AbstractTemplate(tracer) {
            @Override
            public Void call() {
                if (itemId.equals("ex")) {
                    throw new IllegalStateException("예외 발생");
                }
                Thread.sleep(1000);
                return null;
            }
        };
        template.execute("OrderRepository.save()");

    }
}
보면 알 수 있듯이, 기존의 try-catch 구문에 비해 훨씬 간편하게 구현할 수 있게 되었다.
위와 같이 변하는 부분과 변하지 않는 부분을 분리하게 되므로써, SRP 원칙을 지킬 수 있게 되었다. 왜냐하면? 기존에는 부가 기능에 대한 수정이 필요했으면 해당 부가기능을 사용하는 모든 부분에서 수정을 했어야 했다, 하지만 Template 클래스를 통해 부가기능을 묶어둠으로써, template 클래스만 수정하면 모든 부분에 변경사항이 적용된다. 이처럼, 변경 지점을 하나로 모으는 것을 SRP(Single Responsibility Principle)이다.
Strategy
하지만, 상속 방식의 template method가 가지는 큰 문제가 존재한다. 바로 ‘상속’ 이라는 것이다. 상속을 받게 되면 부모 클래스와 자식 클래스간에 강력한 의존관계를 형성하게 된다. 자식 클래스에서는 부모 클래스의 기능을 전혀 사용하지 않는데도, 단순히 상속 받았다는 것으로 부모 클래스의 내용을 전부 알아야한다. 그렇기 때문에, 상속을 받게 되면 두 클래스간에 의존관계가 형성되게 된다.
또한, 상속을 받아서, 핵심 기능을 구현하는 부분 또한, 새로운 자식 클래스를 생성하거나, 익명 내부 클래스를 통해 핵심기능을 재정의해야되는 문제점도 존재한다.
이러한 부분을 해결하는 것이 바로 Strategy 전략이다.
Strategy는 상속 대신, 위임의 방식으로 해당 문제를 해결한다.
template method와 달리, Composition 방식으로 문제를 해결한다.
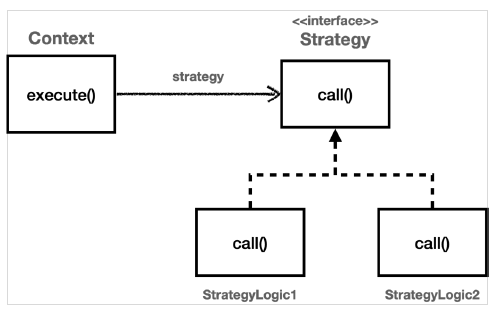
위의 구조를 보게 되면, Context와 Strategy 부분으로 구분되어 있는 것을 확인할 수 있다. Context에는 변하지 않는 부분인 부가 기능이 들어가게 되고, Strategy에는 변하는 부분인 핵심기능이 들어가게 된다.
Context는 그대로 둔 상태에서, Strategy만 부여 하면 된다. 즉, 따로 상속을 받을 필요 없이, 오로지, Strategy interface를 이용하기만 되므로, 상속에 비해 의존관계를 현저히 낮출 수 있다.
기존의 예제를 strategy 방식으로 변환해보자
Practice
public class ContextV1 {
    private Strategy strategy;

    public ContextV1(Strategy strategy) {
        this.strategy = strategy;
    }

    public void execute() {
        Long startTime = System.currentTimeMillis();
        //비즈니스 로직 시작
        strategy.call();
        //비즈니스 로직 종료
        Long endTime = System.currentTimeMillis();
        long resultTime = endTime - startTime;
        log.info("resultTime: {}", resultTime);
    }
}

@Slf4j
public class StrategyLogic1 implements Strategy{
    @Override
    public void call() {
        log.info("비즈니스 로직 1 실행");
    }
}

@Slf4j
public class StrategyLogic2 implements Strategy{
    @Override
    public void call() {
        log.info("비즈니스 로직 2 실행");
    }
}


@Test
void strategy1() {
    StrategyLogic1 strategyLogic1 = new StrategyLogic1();
    ContextV1 contextV1 = new ContextV1(strategyLogic1);
    contextV1.execute();

    StrategyLogic1 strategyLogic2 = new StrategyLogic1();
    ContextV1 contextV2 = new ContextV1(strategyLogic2);
    contextV1.execute();
}
위와 같이 매번 클래스를 만들지 않고 익명 내부 클래스를 활용할 수 있다.
@Test
void strategyV2() {
    ContextV1 contextV1=new ContextV1(
            new Strategy() {
                @Override
                public void call() {
                    log.info("비즈니스 로직 1 실행");
                }
        }
    );
    contextV1.execute();

    ContextV1 contextV2=new ContextV1(
            new Strategy() {
                @Override
                public void call() {
                    log.info("비즈니스 로직 2 실행");
                }
            }
    );
    contextV2.execute();
}
여기서는 추가적으로 람다를 이용한 구현이 가능하다. 위와 같이 메소드가 한개인 인터페이스의 경우 람다로 대체하는 것이 가능하다.
@Test
void strategyV3() {
    ContextV1 contextV1 = new ContextV1(() -> {
        log.info("비즈니스 로직 1 실행");
    });
    contextV1.execute();

    ContextV1 contextV2 = new ContextV1(()->{
        log.info("비즈니스 로직 2 실행");
    });
    contextV2.execute();
}
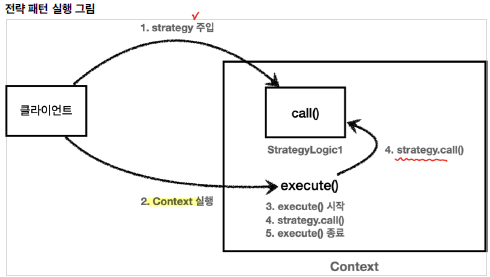
strategy pattern의 동작과정은 위와 같다.
지금 까지 살펴본 strategy는 선조립/후실행을 바탕으로 동작한다. 즉, context를 생성할 때 strategy를 생성자를 통해 제공하므로써 정의해놓고, 나중에, execute을 이용해서 실행하게 된다.
ContextV1 contextV2=new ContextV1(
            new Strategy() {
                @Override
                public void call() {
                    log.info("비즈니스 로직 2 실행");
                }
            }
    );
위와 같은 방식으로 하게 되면, 한번 조립해놓은 context는 실행하기만 하면 된다. 하지만, 런타임에 전략을 바꾸기는 까다롭다, 이럴때는 새로운 context를 생성하는 것이 더 간편하다.
아니면 아래와 같이, 바로 strategy를 전달하는 방법도 생각해볼 수 있다.
public class ContextV2 {

    public void execute(Strategy strategy) {
        Long startTime = System.currentTimeMillis();
        //비즈니스 로직 시작
        strategy.call();
        //비즈니스 로직 종료
        Long endTime = System.currentTimeMillis();
        long resultTime = endTime - startTime;
        log.info("resultTime: {}", resultTime);
    }
}
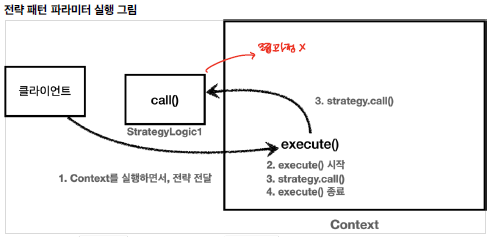
excute 메소드를 실행할 때, strategy를 전달하게 되면, 매번 실행마다 새로운 strategy를 부여하는 것이 가능하다.
@Test
void strategy2() {
    ContextV2 context = new ContextV2();
    context.execute(() -> {
        log.info("비즈니스 로직 1 실행");
    });

    context.execute(() -> {
        log.info("비즈니스 로직 2 실행");
    });

}
strategy를 매번 전달하는 방식의 context-strategy method는 아래와 같이 동작하게 된다.
Template Callback
사실 위의 strategy 전달 방식이 바로 template-callback이다. strategy와 같이 실행가능한 코드를 콜백이라고 하는데, 이는 해당 template을 호출하는 쪽이 실행하는 것이 아니라, 호출 받은 메소드가 뒤에서 해당 부분을 실행한다고 해서 콜백이라는 명칭이 생기게 된것이다.
context는 하나로 고정되어 있는 상태에서, Strategy만 콜백으로 넘어와서 실행되는 것으로 이해하면 된다.
앞서 살펴본 transaction template도 template callback 방식이다.
private final TransactionTemplate txTemplate;
private final MemberRepositoryV3 memberRepository;

public MemberServiceV3_2(PlatformTransactionManager transactionManager,
MemberRepositoryV3 memberRepository) {
    this.txTemplate = new TransactionTemplate(transactionManager);
    this.memberRepository = memberRepository;
}
public void accountTransfer(String fromId, String toId, int money) throws SQLException {
    txTemplate.executeWithoutResult((status) -> {
            try {
                //비즈니스 로직
                bizLogic(fromId, toId, money);
            } catch (SQLException e) {
                throw new IllegalStateException(e);
            }
        }
    );
}
Template Callback 적용
template callback을 controller, service, repository에 적용해보자
Callback
public interface Callback{
    void call();
}
TraceTemplate
public class TraceTemplate {
    private final LogTrace trace;

    public TraceTemplate(LogTrace trace) {
        this.trace = trace;
    }

    public <T> T execute(String message,TraceCallBack<T> callBack){
        TraceStatus traceStatus = null;
        try {
            traceStatus = trace.begin(message);

            T result= callBack.call();

            trace.end(traceStatus);
            return result;
        }catch(Exception e){
            trace.exception(traceStatus, e);
            throw e;
        }

    }
}
Controller
private final OrderServiceV5 orderService;
private TraceTemplate template;

public OrderControllerV5(OrderServiceV5 orderService, LogTrace trace) {
    this.orderService = orderService;
    this.template = new TraceTemplate(trace);
}

@GetMapping("/v5/request")
public String request(String itemId) {
    return template.execute("OrderController.request()",() -> {
        orderService.orderItem(itemId);
        return "ok";
    });

}
Service
private OrderRepositoryV5 orderRepository;
private TraceTemplate traceTemplate;

public OrderServiceV5(OrderRepositoryV5 orderRepository,LogTrace trace) {
    this.orderRepository = orderRepository;
    this.traceTemplate = new TraceTemplate(trace);
}

public void orderItem(String itemId) {
    traceTemplate.execute("OrderService.save()", () -> {
        orderRepository.save(itemId);
        return null;
    });
}
Repository
private TraceTemplate traceTemplate;
public OrderRepositoryV5(LogTrace trace) {
    this.traceTemplate = new TraceTemplate(trace);
}

public void save(String itemId) {
    traceTemplate.execute("OrderRepository.save()", () -> {
        if (itemId.equals("ex")) {
            throw new IllegalStateException("예외 발생");
        }
        Thread.sleep(1000);
        return null;
    });
}
처음에 비해, 매우 효율적으로 부가기능을 사용할 수 있게 되었다. 하지만, 여전히 원본 코드에 수정이 필요하다는 점은 존재한다. 해당 문제를 수정없이 구현하고자 하면 Proxy를 활용해야한다.
References
link: inflearn
link:spring_advanced
댓글남기기