
Finger Princess
Finger Princess
Description
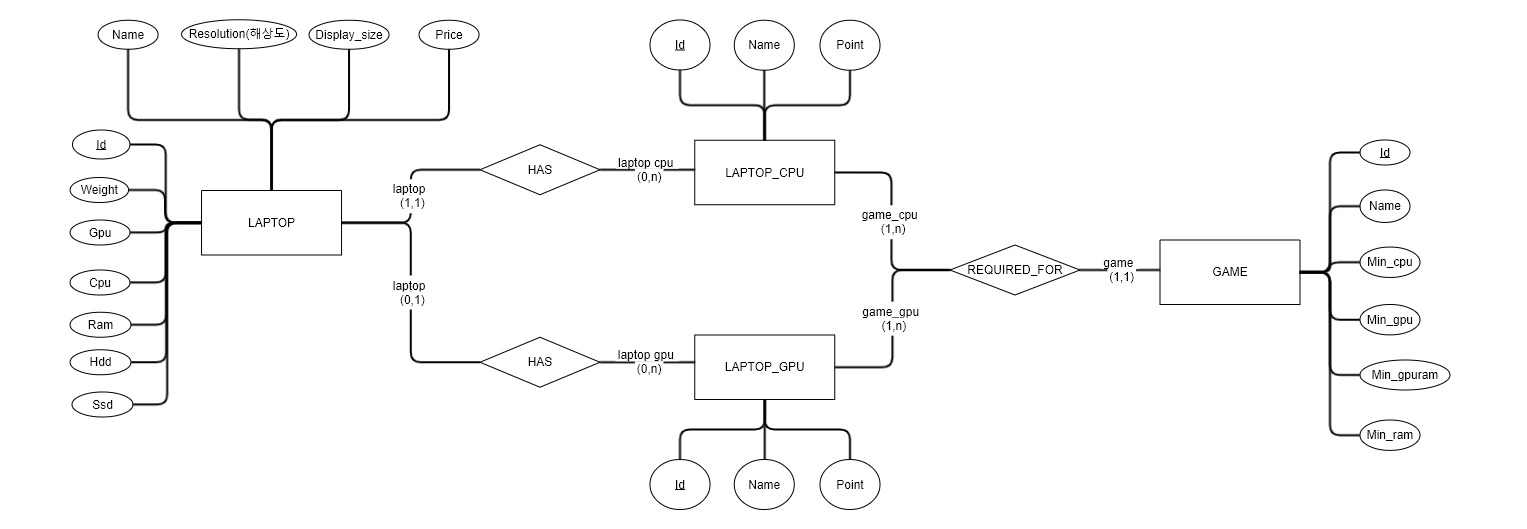
사용자들이 자주 사용하는 프로그램, 게임의 권장 사양에 맞춰 그에 맞는 노트북을 추천해주는 웹어플리케이션이다.
Collaborators
- 한진규 JinkyuHan
- 정제현 JehyunJung
- 김영준 god102104
Duration
2019.12 ~ 2020.02
Techniques
Front

Back

DB

Languages


Motivation
노트북의 경우 여러 브랜드에서 다양한 성능으로 출시를 하게 된다. 하지만 사용자는 어떤게 자신에게 맞는 노트북인지 판단하기 어려워한다. 그럴때 무작정 가격이 저렴한 노트북, 단순히 가벼운 노트북을 기준으로 고르려는 사용자가 많다. 하지만, 노트북을 선택할 때에는 사용자가 자주 사용하는 프로그램과 노트북을 사용하려는 장소(휴대성), 등 다양한 측면에서 고려해서 노트북을 선택하는 것이 중요하다. 그래서 해당 프로젝트를 통해 다양한 프로그램의 최소/권장 사양, 각종 노트북 사양 크롤링, 등 데이터를 미리 저장하고, 사용자가 이용하는 프로그램에 맞는 노트북을 추천하고자 해당 웹 어플리케이션을 만들게 되었다.
Contents
- Web application
- Backend Server
- Data Crawler
- MySQL DB
Web application
웹 어플리케이션의 경우 Javascript 기반의 라이브러리인 ReactJS를 이용해서 UI/UX를 design 했으며 개략적인 design은 아래와 같다.
reactjs를 통해 JSX 문법을 기반으로 Javascript와 HTML을 혼용해서 더욱 효과적인 UI 설계를 할수 있다. 각각의 세부 UI 화면을 component 단위로 구조화하였고
아래의 경우는 설문지를 이루는 question에 대한 component 예시이다.
React Router 설정
<Route path='/questions' exact={ true } component={ Questions } />
Questions Component
class Questions extends React.Component {
  render() {
    const {classes} = this.props;
    return (
      <div className={classes.root}>
        <Grid container spacing={ 3 } >
          <Grid item xs={ 12 }>
            <Header />
          </Grid>
          <Grid item xs={ 12 }>
            <Survey />
          </Grid>
        </Grid>
      </div>
    )
  }
}
Survey Component
<div className='Survey'>
    <Container maxWidth='lg'>
        <Stepper activeStep={ activeStep } orientation="vertical">
            {/* {steps.map((step, index) => (
                console.log(step)
                < Step key = { index } >
                <StepLabel>{step.label}</StepLabel>
                <StepContent>{step.question}</StepContent>
                </Step>
        ))} */}
            < Step key={ 1 } >
                <StepLabel>{ '플레이 하는 모든 게임을 선택하세요' }</StepLabel>
                <StepContent>
                    <QuestionA setParentAnswer={this.setAnswer} goNextSurvey={this.handleNext} goPreviousSurvey={this.handlePrevious}/>
                </StepContent>
            </Step>
            < Step key={ 2 } >
                <StepLabel>{ '실내/실외' }</StepLabel>
                <StepContent>
                    <QuestionB setParentAnswer={this.setAnswer} goNextSurvey={this.handleNext} goPreviousSurvey={this.handlePrevious}/>
                </StepContent>
            </Step>
            < Step key={ 3 } >
                <StepLabel>{ '자주 사용하는 프로그램' }</StepLabel>
                <StepContent>
                    <QuestionC setParentAnswer={this.setAnswer} goNextSurvey={this.handleNext} goPreviousSurvey={this.handlePrevious}/>
                </StepContent>

            </Step>
            < Step key={ 4 } >
                <StepLabel>{ '가격 상한선' }</StepLabel>
                <StepContent>
                    <QuestionD setParentAnswer={this.setAnswer} goNextSurvey={this.handleNext} goPreviousSurvey={this.handlePrevious}/>
                </StepContent>

            </Step>
            < Step key={ 5 } >
                <StepLabel>{ '성능우선/기능우선/서비스우선' }</StepLabel>
                <StepContent>
                    <QuestionE setParentAnswer={this.setAnswer} goPreviousSurvey={this.handlePrevious} submitSurvey={this.hanldeSubmit}/>
                </StepContent>
            </Step>
        </Stepper>
    </Container>
</div >
Backend Server
서버의 경우 python 기반의 django 프레임워크를 기반으로 활용하였다. 웹 서버를 개발하는 경험이 적은 상황에서 Spring과 같이 Learning Curve가 높은 프레임워크를 이용하기 보다는 웹 서비스의 기본 개념인 MVT, ORM을 익히고자하는 목적이 컸으며, python을 기반으로 웹 크롤러 활용을 위해 Django 기반의 웹 어플리케이션 개발에 초점을 맞췄다.
Routing 설정
ORM을 활용해서 아래와 같이 View을 URL로 등록
urls.py
path('fp_api/', include('fp_api.urls'))
fp_api을 app으로 만들어서 app 단위로 url routing을 그룹핑하였다. 메인 Project에서 여러 App에 관한 Url routing을 그룹핑함으로써 Routing을 깔끔하게 관리할 수 있게 된다. django rest framework을 활용해서 viewset을 이용해서 CRUD가 자동으로 이루어질 수 있도록 한다.
fp_api/urls.py
router = routers.DefaultRouter()
router.register('cpus',views.CpuViewSet)
router.register('gpus',views.GpuViewSet)
router.register('laptops',views.LaptopViewSet)
router.register('games',views.GameViewSet)
router.register('programs',views.ProgramViewSet)
CORS setting
react.js 와 backend server을 따로 관리하면서 발생하는 포트 차이로 인한 CORS 문제가 발생하게 되는데, 이를 해결하기 위해 corsheaders middleware을 추가해서 허용한 IP 목록을 작성해서 해당 IP에서의 요청에 대해 CORS을 우회할 수 있도록 한다.
INSTALLED_APPS =[
...
'corsheaders', # CORS 관련 추가
]
...
MIDDLEWARE = [
	'corsheaders.middleware.CorsMiddleware',     # CORS 관련 추가
...
]
...
# CORS 관련 추가
CORS_ORIGIN_WHITELIST = ['http://127.0.0.1:3000'
                         ,'http://localhost:3000']
Model
Django 프레임워크를 활용하게 되면 DB에 직접적으로 접근하게 될 이유는 없다. ORM을 활용하여 DB와의 연동을 쉽게 처리할 수 있게 된다. Model <-> Entity Mapping을 이용해서 SQL Programming을 수행하지 않아도 DB로부터 데이터를 받아올 수 있다.
Example : Gpu class
id,name,point을 attribute로 가지고 id를 primary key를 가지는 Model을 정의하고자 하면 아래와 같다.
class Gpu(models.Model):
    id = models.IntegerField(primary_key=True)
    name = models.CharField(max_length=30, unique=True)
    point = models.FloatField()

    def __str__(self):
        return self.name

    class Meta:
        ordering = ['point']
Data Crawler
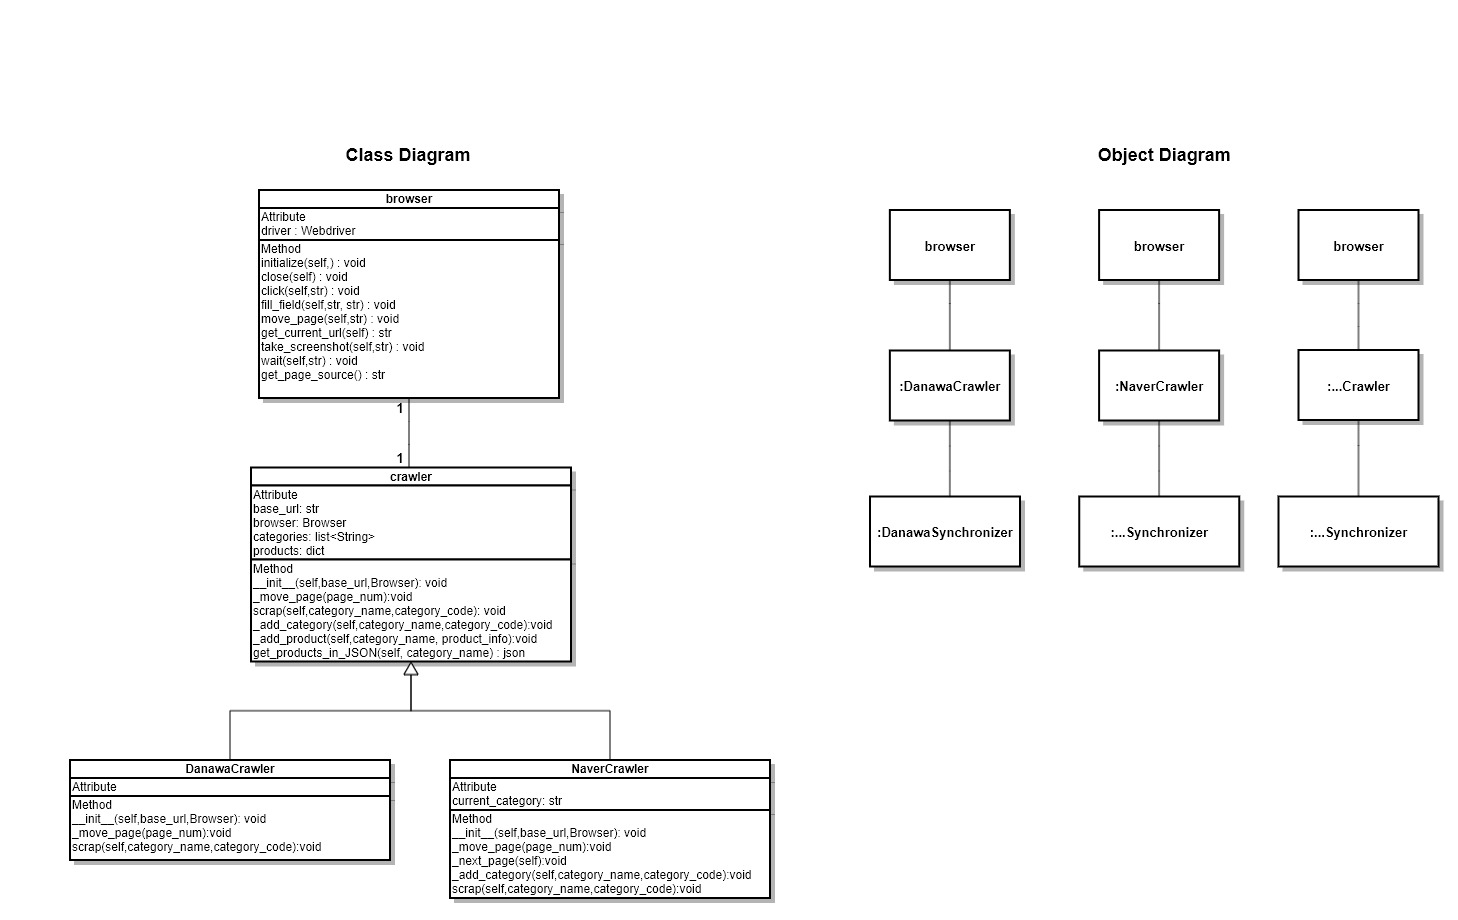
beautiful soup과 selenium 모듈을 활용해서 웹사이트 이동을 자동화하였고, 필요한 노트북 정보를 아래와 같이 json 형태로 받아서 이를 DB에 저장하였다.
Browser
selenium 모듈을 활용하여 웹 사이트의 동작을 자동화하였습니다. 버튼 클릭, 자바스크립트 랜더링과 같이 동적으로 동작하는 환경에서 beautifulsoup 만을 활용해서 모든 데이터를 크롤링해오기는 불가능해서 selenium을 활용하여 웹사이트 동작 과정을 자동화하였다.
class Browser():
    def __init__(self):
        set_options = webdriver.ChromeOptions()
        set_options.add_argument('headless')
        set_options.add_argument('window-size=640x480')
        self.driver = webdriver.Chrome(
            '/home/jhyun1000/pythonProgramming/driver/chromedriver', options=set_options)

    def close(self):
        self.driver.close()

    def click(self, CSS_selector):
        self.driver.find_element_by_css_selector(CSS_selector).click()

    def fill_field(self, CSS_selector, content):
        self.driver.find_element_by_css_selector(
            CSS_selector).send_keys(content)

    def move_location(self, url):
        self.driver.get(url)

    def get_current_page_url(self):
        return self.driver.current_url

    def take_screenshot(self, file_path):
        self.driver.get_screenshot_as_file(file_path)

    def wait(self, time):
        self.driver.implicitly_wait(time)

    def get_current_html(self):
        return self.driver.page_source

    def execute_script(self, javascript: str):
        self.driver.execute_script(javascript)

    def select_dropdown_item(self,dropdown_tag, value):
        Select(self.driver.find_element_by_css_selector(dropdown_tag)).select_by_value(value)
Crawler module
beautifulsoup을 이용해서 필요한 노트북 사양 정보를 받아왔다.
while True:
    page_num += 1
    self._move_page(page_num)
    soup = BeautifulSoup(
        self.browser.get_current_html(), 'html.parser')
    scraped_list = soup.select('.prod_main_info')
    if len(scraped_list) == 0:
        break
    for each_scraped in scraped_list:
        product_info = {}
        product_info['name'] = each_scraped.select_one(
            '.prod_info > p > a').get_text().strip()
        product_info['price'] = each_scraped.select_one(
            'p.price_sect > a > strong').get_text().strip()
        for spec in each_scraped.select('.view_dic'):
            product_info[spec.get('onclick')] = spec.get_text()
        self._add_product(category_name, product_info)
노트북 사양 정보
{
		"name": "삼성전자 갤럭시북 플렉스 NT930QCG-K716A (기본)",
		"price": "2,289,000",
		"spec_list": {
			"jQuery.termDicViewLink(1706,'view',this,8)": "인텔",
			"jQuery.termDicViewLink(210460,'view',this,8)": "아이스레이크",
			"jQuery.termDicViewLink(22143,'view',this,8)": "쿼드코어",
			"jQuery.termDicViewLink(1476,'view',this,8)": "33.7cm(13.3인치)",
			"jQuery.termDicViewLink(1708,'view',this,8)": "1920x1080(FHD)",
			"jQuery.termDicViewLink(904,'view',this,8)": "광시야각",
			"jQuery.termDicViewLink(26549,'view',this,8)": "슬림형 베젤",
			"jQuery.termDicViewLink(360,'view',this,8)": "터치스크린",
			"jQuery.termDicViewLink(358,'view',this,8)": "회전LCD",
			"jQuery.termDicViewLink(30277,'view',this,8)": "LPDDR4x(온보드)",
			"jQuery.termDicViewLink(288,'view',this,8)": "16GB",
			"jQuery.termDicViewLink(25742,'view',this,8)": "M.2(NVMe)",
			"jQuery.termDicViewLink(2,'view',this,8)": "512GB",
			"jQuery.termDicViewLink(3515,'view',this,8)": "블루투스 5.0",
			"jQuery.termDicViewLink(328,'view',this,8)": "웹캠",
			"jQuery.termDicViewLink(25931,'view',this,8)": "USB Type-C",
			"jQuery.termDicViewLink(2305,'view',this,8)": "썬더볼트(2개)",
			"jQuery.termDicViewLink(29970,'view',this,8)": "UFS",
			"jQuery.termDicViewLink(335,'view',this,8)": "키보드 라이트",
			"jQuery.termDicViewLink(330,'view',this,8)": "지문 인식",
			"jQuery.termDicViewLink(29232,'view',this,8)": "TPM",
			"jQuery.termDicViewLink(29619,'view',this,8)": "전용 펜 지원",
			"jQuery.termDicViewLink(1990,'view',this,8)": "69.7Wh",
			"jQuery.termDicViewLink(25573,'view',this,8)": "윈도우10",
			"jQuery.termDicViewLink(25877,'view',this,8)": "12.9mm",
			"jQuery.termDicViewLink(1478,'view',this,8)": "1.16kg",
			"jQuery.termDicViewLink(28127,'view',this,8)": "용도",
			"jQuery.termDicViewLink(25544,'view',this,8)": "사무/인강용",
			"jQuery.termDicViewLink(25542,'view',this,8)": "휴대용"
		}
	}
MySQL
Conclusions
해당 웹 어플리케이션 프로젝트를 통해 웹 서비스의 전체적인 기본기를 익힐 수 있는 경험이 되었다. MVT, ORM 과 같은 웹 서비스의 필수 개념을 직접 구현함으로써 체득할 수 있는 계기가 되었고 front, db, 등도 사용하면서 전체적 개념을 잡을 수 있었다.
댓글남기기