
Kubernetes Label
Kubernetes Label
수 많은 종류의 pod에 대해 label을 활용해서 구분하는 것이 가능하다, 관리의 용이성을 위해 pod에 label을 부여해서 관리한다.
Key:Value 형태로 label을 할당한다.
아래와 같이 복합적으로 label을 구성해서 pod들을 분류할 수 있다.
Labels & Selector
Label Template
metadata:
  Labels:
    key1: value1
    key2: value2
Selector Template
selector:
  matchLabels:
    key1: value
  matchExpressions:
    {key: key1, operator: In, values: [value1]}
replica set과 유사하게 selector 연산식을 통한 label을 매칭 시킬 수 있다.
Practice
apiVersion: v1
kind: Pod
metadata:
  name: label-pod-demo
  labels:
    name: mainui
    rel: stable
spec:
  containers:
  - image: nginx:1.14
    name: nginx-label
    ports:
    - containerPort: 80
아래와 같이, pod에 label이 할당되는 것을 확인할 수 있다.
toojey-master@toojeymaster-VirtualBox:~/kubernetes$ kubectl create -f label-pod.yaml
pod/label-pod-demo created
toojey-master@toojeymaster-VirtualBox:~/kubernetes$ kubectl get pods --show-labels
NAME             READY   STATUS    RESTARTS   AGE   LABELS
label-pod-demo   1/1     Running   0          8s    name=mainui,rel=stable
아래와 같이 label이 다른 pod를 하나 생성하고, 이번에는 selector을 적용해서 pod를 조회해보자
apiVersion: v1
kind: Pod
metadata:
  name: label-pod-demo2
  labels:
    name: loginui
    rel: stable
spec:
  containers:
  - image: nginx:1.14
    name: nginx-label
    ports:
    - containerPort: 80
아래의 결과를 확인해보면 name=labelui인 pod만 조회되는 것을 확인할 수 있다.
toojey-master@toojeymaster-VirtualBox:~/kubernetes$ kubectl get pods
NAME              READY   STATUS    RESTARTS   AGE
label-pod-demo    1/1     Running   0          3m51s
label-pod-demo2   1/1     Running   0          2s
toojey-master@toojeymaster-VirtualBox:~/kubernetes$ kubectl get pods -l name=mainui
NAME             READY   STATUS    RESTARTS   AGE
label-pod-demo   1/1     Running   0          3m56s
–selector 옵션을 적용해서 동일한 결과를 얻을 수 있다.
toojey-master@toojeymaster-VirtualBox:~/kubernetes$ kubectl get pods
NAME              READY   STATUS    RESTARTS   AGE
label-pod-demo    1/1     Running   0          13m
label-pod-demo2   1/1     Running   0          9m17s
toojey-master@toojeymaster-VirtualBox:~/kubernetes$ kubectl get pod --selector name=mainui
NAME             READY   STATUS    RESTARTS   AGE
label-pod-demo   1/1     Running   0          13m
label 명령어를 통해 cli 상에서 label 수정

이미 등록된 label에 대한 값을 수정하고자 할 때는 위와 같이 –overwrite 옵션을 추가해야된다.
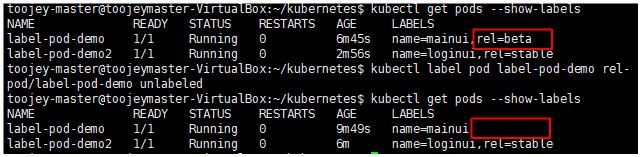
key 뒤에 value를 입력하지 않고 - 만 사용하는 경우 해당 label을 제거할 수 있다.
Worker Node Labeling
위에서는 pod에 label을 설정해서, pod를 서로 분리해줬지만, worker node에 대해서도 labeling을 수행할 수 있다.
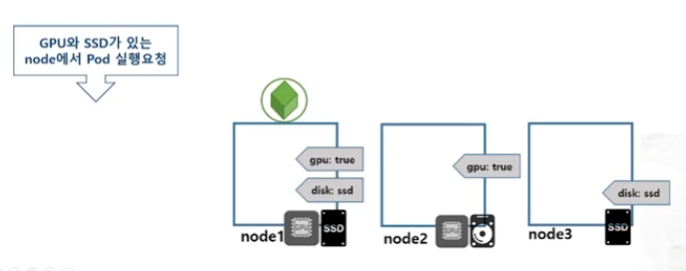
특정 사양에 대해 labeling을 설정해서, 특정 사양을 만족하는 node에 pod를 실행시키도록 지정할 수 있다.
Practice
Node Labeling
| node | gpu | disk |
|---|---|---|
| node1 | true | ssd |
| node2 | true |
toojey-master@toojeymaster-VirtualBox:~/kubernetes$ kubectl label nodes toojeynode1-virtualbox gpu=true disk=ssd
node/toojeynode1-virtualbox labeled
toojey-master@toojeymaster-VirtualBox:~/kubernetes$ kubectl label nodes toojeynode2-virtualbox gpu=true
node/toojeynode2-virtualbox labeled
위와 같이 node에 대한 labeling을 설정하게 되면 아래와 같이 labeling이 수행된 것을 확인할 수 있다.
toojey-master@toojeymaster-VirtualBox:~/kubernetes$ kubectl get nodes --show-labels
NAME                      STATUS   ROLES           AGE     VERSION   LABELS
toojeymaster-virtualbox   Ready    control-plane   3h24m   v1.25.0   beta.kubernetes.io/arch=amd64,beta.kubernetes.io/os=linux,kubernetes.io/arch=amd64,kubernetes.io/hostname=toojeymaster-virtualbox,kubernetes.io/os=linux,node-role.kubernetes.io/control-plane=,node.kubernetes.io/exclude-from-external-load-balancers=
toojeynode1-virtualbox    Ready    <none>          3h21m   v1.25.0   beta.kubernetes.io/arch=amd64,beta.kubernetes.io/os=linux,disk=ssd,gpu=true,kubernetes.io/arch=amd64,kubernetes.io/hostname=toojeynode1-virtualbox,kubernetes.io/os=linux
toojeynode2-virtualbox    Ready    <none>          3h21m   v1.25.0   beta.kubernetes.io/arch=amd64,beta.kubernetes.io/os=linux,gpu=true,kubernetes.io/arch=amd64,kubernetes.io/hostname=toojeynode2-virtualbox,kubernetes.io/os=linux
toojey-master@toojeymaster-VirtualBox:~/kubernetes$
하지만, 이렇게 보면, 너무 많은 label이 섞여 있어 알아보기 힘들다. 이럴때, 아래의 명령어를 통해 특정 label에 대해서 한정지어서 볼 수 있다.
toojey-master@toojeymaster-VirtualBox:~/kubernetes$ kubectl get nodes -L disk,gpu
NAME                      STATUS   ROLES           AGE     VERSION   DISK   GPU
toojeymaster-virtualbox   Ready    control-plane   3h26m   v1.25.0
toojeynode1-virtualbox    Ready    <none>          3h24m   v1.25.0   ssd    true
toojeynode2-virtualbox    Ready    <none>          3h24m   v1.25.0          true
NodeSelector
pod를 생성할때, nodeSelector property를 추가해서, 특정 label을 가지고 있는 node에 pod를 실행하도록 할 수 있다.
apiVersion: v1
kind: Pod
metadata:
  name: nodeselector-pod
spec:
  containers:
  - image: nginx:1.14
    name: nginx-label
    ports:
    - containerPort: 80
  nodeSelector:
    gpu: "true"
    disk: ssd
위와 같이 nodeselector을 gpu=true, disk=ssd인 node에서 실행하도록 설정하게 되면, 해당 label을 가지고 있는 node1 에서만 실행이 된다.

만약, 해당하는 node를 할당 받지 못하게 되면 pending 상태를 하게 된다.
apiVersion: v1
kind: Pod
metadata:
  name: nodeselector-pod2
spec:
  containers:
  - image: nginx:1.14
    name: nginx-label
    ports:
    - containerPort: 80
  nodeSelector:
    gpu: "false"
    disk: ssd

Annotation
label과 동일하게 key:value 형태로 리소스의 특성을 기록할 수 있다.
kubernetes에 특정 정보를 전달할 때, annotation을 활용한다. 가령, deployment의 rollingupdate 과정을 수행할때, 아래와 같이 version 정보를 annotation을 이용해서 활용하였다.
annotations:
  kubernetes.io/change-cause: version 1.15
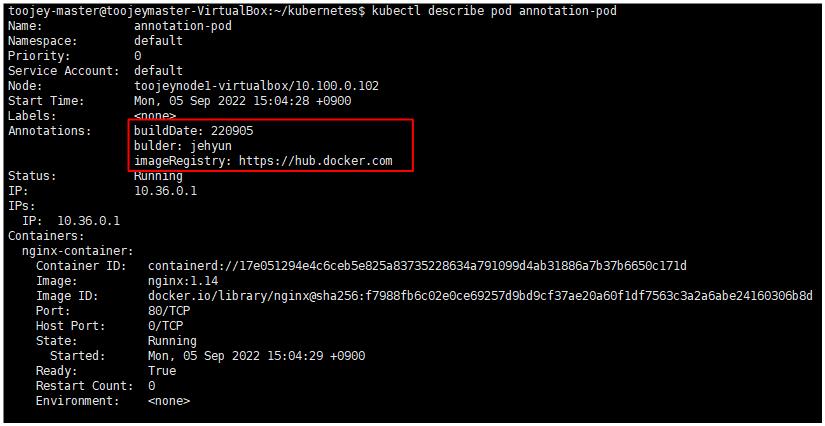
혹은, 관리의 목적으로, builder, buildDate와 같은 정보를 남기기 위해 사용하는 것도 가능하다.
annotations:
  builder: "jehyun"
  buildDate: "20220905"
Practice
apiVersion: v1
kind: Pod
metadata:
  name: annotation-pod
  annotations:
    imageRegistry: "https://hub.docker.com"
spec:
  containers:
  - image: nginx:1.14
    name: nginx-container
    ports:
    - containerPort: 80
annotation은 metadata에 추가시켜서 활용한다. 그러면, describe을 통해 확인 해보면 아래와 같이 annotation 정보가 추가되어 있는 것을 확인할 수 있다.
Carnary Deployment
애플리케이션 배포 방법
-
블루그린 업데이트 블루(old) 서비스를 모두 다 내린 다음 그린(new) 서비스를 올리는 방식, 서비스 다운 시간이 존재하는 방식
-
카나리 업데이트 기존의 버전을 유지한 채, 일부 기능만 신규 버전을 동작시켜서 문제가 없는 지 확인하면서 기능을 추가하는 방식, 기능을 부분적으로 신규 버전으로 만드는 방식
-
롤링 업데이트 deployment에서 수행한 방식으로, 서비스를 유지한 채, 새로운 서비스를 한개씩 올리면서 기존의 서비스를 내리는 방식으로 무중단 서비스를 제공한다.
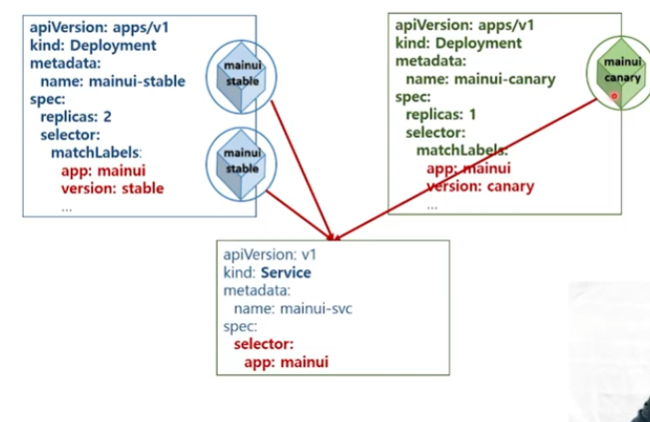
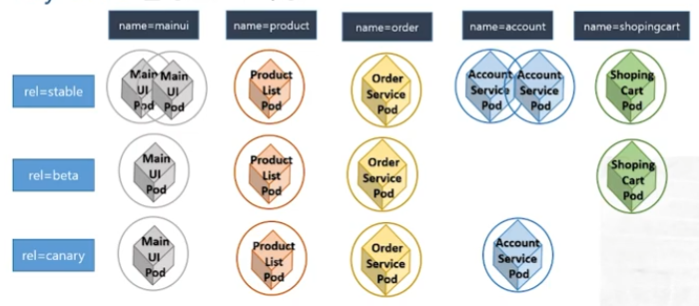
위와 같이, 기존의 서비스는 유지 한채, 카나리 서비스(부분 기능)을 올려서 테스트 하면서, 문제가 없으면 추가하는 방식이다.
이때, 기존의 버전과 신규 버전은 하나의 서비스로 묶이기 때문에 사용자는 어떠한 버전이 제공되는지는 알지 못한 채로 사용하게 된다.
Pratice
위의 도식도를 토대로 carnary update를 구성해보자
mainui-stable
apiVersion: apps/v1
kind: Deployment
metadata:
  name: mainui-stable
spec:
  replicas: 2
  selector:
    matchLabels:
      app: mainui
      version: stable
  template:
    metadata:
      labels:
        app: mainui
        version: stable
    spec:
      containers:
      - image: nginx:1.14
        name: nginx
      - ports:
          - containerPort: 80
mainui-service
apiVersion: v1
kind: Service
metadata:
  name: mainui-service
spec:
  type: ClusterIP
  selector:
    app: mainui
  ports:
    - protocol: TCP
      port: 80
      targetPort: 80
해당 서비스에 대한 단일 진입점(service) 구성
mainui-carnary
apiVersion: apps/v1
kind: Deployment
metadata:
  name: mainui-carnary
spec:
  replicas: 1
  selector:
    matchLabels:
      app: mainui
      version: carnary
  template:
    metadata:
      labels:
        app: mainui
        version: carnary
    spec:
      containers:
      - image: nginx:1.15
        name: nginx
        ports:
          - containerPort: 80
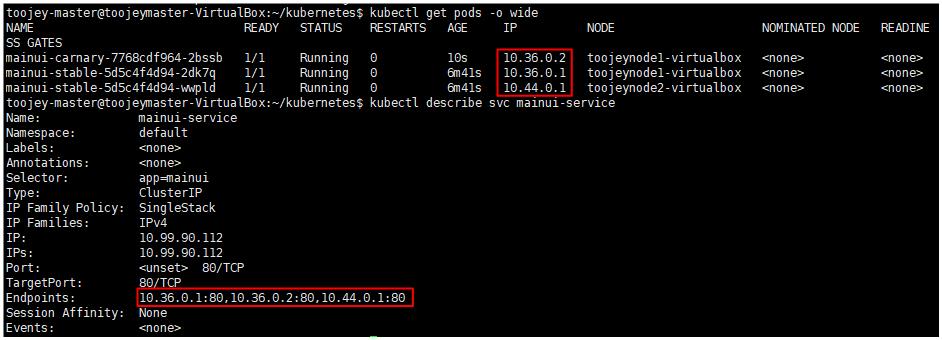
위의 carnary pod까지 실행해보면 총 3개의 pod가 service에 의해서 묶인 것을 확인할 수 있다.
이런식으로 구성한 후, 사용자를 대상으로 한 베타 테스트를 진행한 후, scale 명령어를 통해 carnary 개수를 늘리거나, 기존의 서비스를 줄이는 방식을 취할 수 있다.
즉, label을 적절히 사용하면서, 위와 같이 버전 관리를 할 수 있게 된다.
댓글남기기