
Kubernetes DNS
Kubernetes DNS
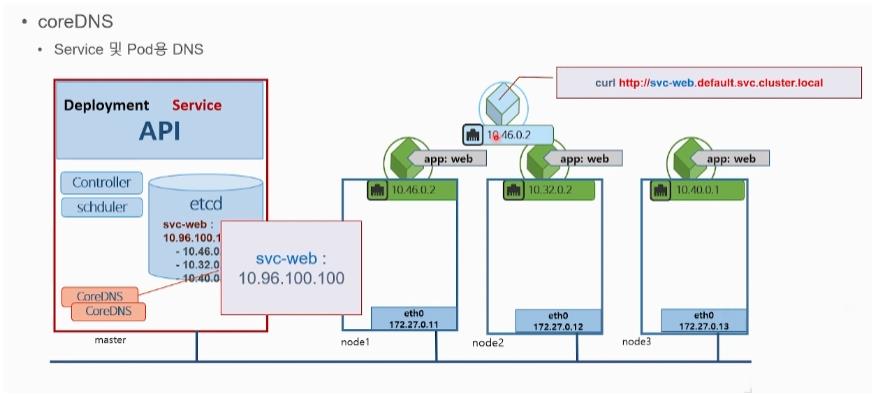
kubernetes에서는 coreDNS를 통해 pod와 service에 대한 DNS를 제공한다.
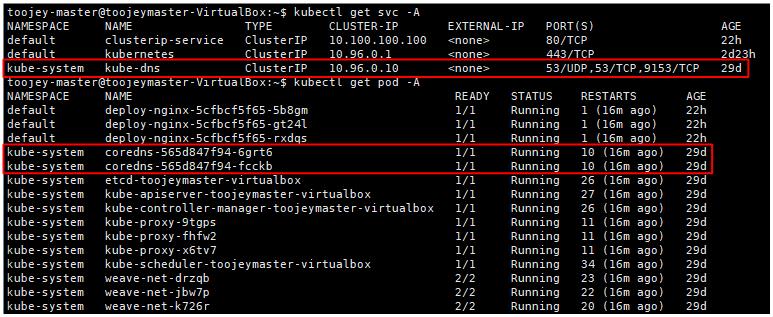
실제로 kubernetes에서 동작되는 dns를 확인해보면 아래와 같이, core-dns는 kube-dns service를 통해 DNS 서비스를 제공한다.
coreDNS 사용
실제로 service 이름에 대한 DNS를 지원하는 지 알아보기 위와 같은 시스템을 구성해서 테스트를 진행해보자 앞서, network에서 다룬 시스템에서 이어나가면 된다.
deployments, service가 동작하고 있는 상황에서 새로운 pod를 하나 생성해서 해당 pod에서 service에 대한 요청이 가능한지 확인해보자
centos7 pod 생성
kubectl run client-pod --image=centos7 -it -- /bin/bash
IP를 통한 service 요청
[root@client-pod /]# curl 10.100.100.100
<!DOCTYPE html>
<html>
<head>
<title>Welcome to nginx!</title>
<style>
    body {
        width: 35em;
        margin: 0 auto;
        font-family: Tahoma, Verdana, Arial, sans-serif;
    }
</style>
</head>
<body>
<h1>Welcome to nginx!</h1>
<p>If you see this page, the nginx web server is successfully installed and
working. Further configuration is required.</p>

<p>For online documentation and support please refer to
<a href="http://nginx.org/">nginx.org</a>.<br/>
Commercial support is available at
<a href="http://nginx.com/">nginx.com</a>.</p>

<p><em>Thank you for using nginx.</em></p>
</body>
</html>
domain를 통한 service 요청
[root@client-pod /]# curl clusterip-service.default.svc.cluster.local
<!DOCTYPE html>
<html>
<head>
<title>Welcome to nginx!</title>
<style>
    body {
        width: 35em;
        margin: 0 auto;
        font-family: Tahoma, Verdana, Arial, sans-serif;
    }
</style>
</head>
<body>
<h1>Welcome to nginx!</h1>
<p>If you see this page, the nginx web server is successfully installed and
working. Further configuration is required.</p>

<p>For online documentation and support please refer to
<a href="http://nginx.org/">nginx.org</a>.<br/>
Commercial support is available at
<a href="http://nginx.com/">nginx.com</a>.</p>

<p><em>Thank you for using nginx.</em></p>
</body>
</html>
ip를 통한 pod 접속
[root@client-pod /]# curl 10-36-0-1.default.pod.cluster.local
<!DOCTYPE html>
<html>
<head>
<title>Welcome to nginx!</title>
<style>
    body {
        width: 35em;
        margin: 0 auto;
        font-family: Tahoma, Verdana, Arial, sans-serif;
    }
</style>
</head>
<body>
<h1>Welcome to nginx!</h1>
<p>If you see this page, the nginx web server is successfully installed and
working. Further configuration is required.</p>

<p>For online documentation and support please refer to
<a href="http://nginx.org/">nginx.org</a>.<br/>
Commercial support is available at
<a href="http://nginx.com/">nginx.com</a>.</p>

<p><em>Thank you for using nginx.</em></p>
</body>
</html>
이 처럼 kubernetes 환경에서 동작하는 pod는 아래와 같이 기본적으로 coreDNS가 등록되어 있으며, 이를 통한 pod,service에 대한 요청이 정상적으로 이루어지게 되는 것이다.
[root@client-pod /]#  cat /etc/resolv.conf
search default.svc.cluster.local svc.cluster.local cluster.local
nameserver 10.96.0.10
options ndots:5
DNS 편집
위에서 보면 pod를 생성하게 되면 기본적으로 kubernetes의 coreDNS 정보가 들어가는 것을 확인할 수 있다. 하지만, 특정 DNS 서버 정보를 지정해서 pod를 생성하는 것이 가능하다.
apiVersion: v1
kind: Pod
metadata:
  namespace: default
  name: dns-example
spec:
  containers:
    - name: test
      image: nginx
  dnsPolicy: "None"
  dnsConfig:
    nameservers:
      - 1.2.3.4
    searches:
      - ns1.svc.cluster-domain.example
      - my.dns.search.suffix
    options:
      - name: ndots
        value: "2"
      - name: edns0
아래의 명령어 실행을 통해 위에서 설정한 DNS 서버 정보로 설정되는 것을 확인할 수 있다.
toojey-master@toojeymaster-VirtualBox:~/kubernetes$ kubectl create -f dns-example-pod.yaml
pod/dns-example created
toojey-master@toojeymaster-VirtualBox:~/kubernetes$ kubectl exec dns-example -it -- /bin/bash
root@dns-example:/# cat /etc/resolv.conf
search ns1.svc.cluster-domain.example my.dns.search.suffix
nameserver 1.2.3.4
options ndots:2 edns0
댓글남기기