
kubectl commands
kubectl을 이용해서 kubernetes 환경 실습
kubectl??
kubernetes에 원하는 작업을 요청하는 명령어를 의미한다.
구조
kubectl [command] [type] [name] [flags]
| field | description | example |
|---|---|---|
| command | cluster에 요청하게 될 명령어 | create,get,edit.. |
| type | 자원의 타입 명시 | node, pod, service |
| name | 자원의 이름 명시 | |
| flags | 부가 옵션 | –help, -o options |
–help 명령어를 이용해서 해당 명령어를 사용하는 방법에 대해서 자세히 알 수 있다.
=> kubectl get pod webserver -o wide
pod type인 webserver의 정보를 자세히 보여줘를 뜻하는 명령어이다.
노드 정보 추출
get nodes
kubectl get nodes
NAME                      STATUS   ROLES           AGE   VERSION
toojeymaster-virtualbox   Ready    control-plane   14h   v1.25.0
toojeynode1-virtualbox    Ready    <none>          14h   v1.25.0
toojeynode2-virtualbox    Ready    <none>          14h   v1.25.0
get nodes -o wide
kubectl get nodes -o wide
toojeymaster-virtualbox   Ready    control-plane   14h   v1.25.0   10.100.0.101   <none>        Ubuntu 20.04.4 LTS   5.15.0-46-generic   containerd://1.6.7
toojeynode1-virtualbox    Ready    <none>          14h   v1.25.0   10.100.0.102   <none>        Ubuntu 20.04.4 LTS   5.15.0-46-generic   containerd://1.6.7
toojeynode2-virtualbox    Ready    <none>          14h   v1.25.0   10.100.0.104   <none>        Ubuntu 20.04.4 LTS   5.15.0-46-generic   containerd://1.6.7
describe
kubectl describe nodes
Name:               toojeymaster-virtualbox
Roles:              control-plane
Labels:             beta.kubernetes.io/arch=amd64
Annotations:        kubeadm.alpha.kubernetes.io/cri-socket: unix:///var/run/containerd/containerd.sock
CreationTimestamp:  Wed, 24 Aug 2022 21:36:38 +0900
Taints:             node-role.kubernetes.io/control-plane:NoSchedule
Unschedulable:      false
Lease:
Conditions:
Addresses:
  InternalIP:  10.100.0.101
  Hostname:    toojeymaster-virtualbox
Capacity:
  cpu:                3
  ephemeral-storage:  19947120Ki
  hugepages-2Mi:      0
  memory:             2022996Ki
  pods:               110
Allocatable:
System Info:

Non-terminated Pods:
Allocated resources:

Events:
Name:               toojeynode1-virtualbox
...
Name:               toojeynode2-virtualbox
...
이 처럼, 노드 정보를 추출하는 명령어는 위와 같이 있으며, 보여주는 정보의 차이가 난다.
container pod 실행해보기
kubectl run webserver --image=nginx:1.14 --port 80
webserver을 이름으로 한 container pod을 실행하는데, 이때 nginx를 기반으로 동작하게 하며, 포트를 80번에 할당한다.
pod 정보 추출
kubectl get pods
toojey-master@toojeymaster-VirtualBox:~$ kubectl get pods
NAME        READY   STATUS    RESTARTS   AGE
webserver   1/1     Running   0          24s
kubectl get pods -o wide
아래의 그림을 보면 확인할 수 있는 점은, node1 에서 nginx 서버가 동작중인것을 확인할 수 있다. 이 처럼, master node에서는 kubectl 명령어를 이용해서 cluster에 작업을 할당할 수 있다.

nginx 서버 접속
- curl
- command line 기반으로 http요청 시도를 할 수 있는 명령어이다.
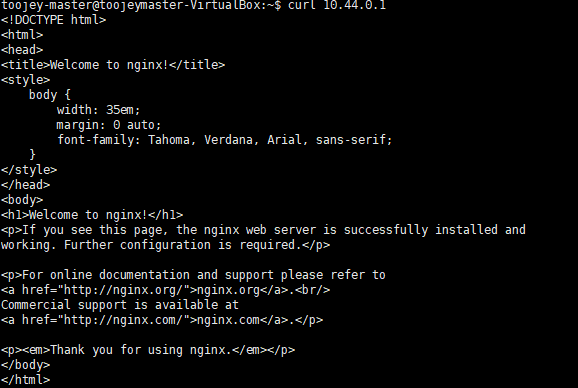
curl 10.44.0.1
- elinks
조금 더 그래픽을 추가한 command line 기반의 http 접속 요청을 수행할 수 있다.
elinks 10.44.0.1

deployment 생성하기
run 을 이용해서 pod를 1개 생성할 수 있었다면, create를 이용해서 3개의 서버를 실행해줘 라는 형태의 명령어를 수행할 수 있게 된다.
kubectl create deployment mainui --image=httpd --replicas=3
httpd(apache web server)을 3개 실행시킬 수 있게 된다.
deployment 정보 추출
toojey-master@toojeymaster-VirtualBox:~$ kubectl get
deployments.apps
NAME     READY   UP-TO-DATE   AVAILABLE   AGE
mainui   3/3     3            3           19s
해당 명령어를 이용해서 apache webserver을 3개 만들었다. 그러면, get pods를 하게 되면 어떤 결과를 보여주게 될까?
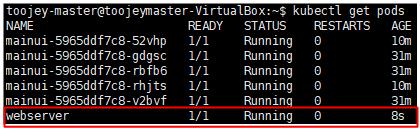
kubectl get pods -o wide

위와 같이 3개의 pod가 추가로 생성된 것을 확인할 수 있다. 또한, node1, node2에 분배되어서 실행되는 것을 확인할 수 있다.
container에 접속해서 index.html 페이지 변경해보기
기존에 생성한 webserver을 접속하게 되면 아래와 같이 기본 홈페이지가 출력된게 된다.
하지만, 내가 원하는 홈페이지가 보여지게 하도록 할 수 있을까?
그러려면 우선 해당 webserver을 실행하는 container에 접속해야한다.
container 접속
toojey-master@toojeymaster-VirtualBox:~$ kubectl exec webserver -it -- /bin/bash
위와 같이 해당 컨테이너에 접속해서 shell 형태로 실행해보면 아래와 같이 webserver에 접속된 것을 확일할 수 있고, index.html 파일이 있는 것을 확인할 수 있다.

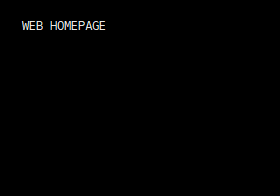
index.html 수정
root@webserver:/usr/share/nginx/html# echo "WEB HOMEPAGE" > index.html
root@webserver:/usr/share/nginx/html# exit
elinks 10.44.0.1
index.html을 수정한 후 nginx 서버에 다시 접속해보면 아래와 같이 변경사항이 적용된 것을 확인할 수 있다.
edit
edit command을 이용해서 현재 동작 중인 자원에 대한 수정을 진행할 수 있다.
kubectl edit deployments.apps mainui
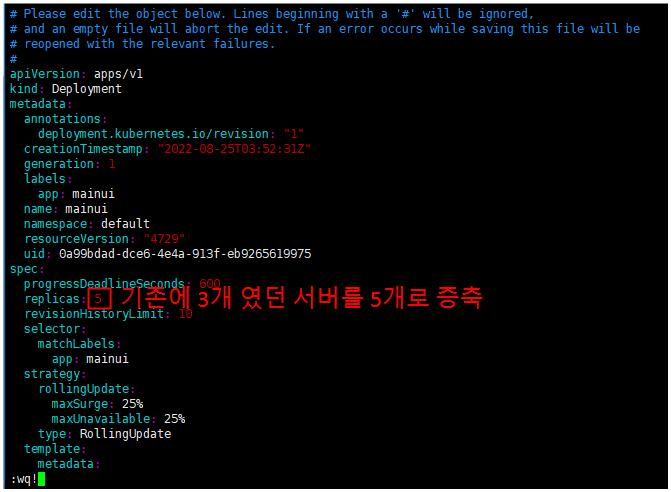
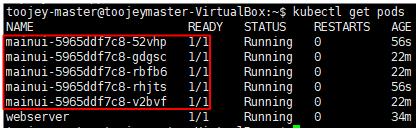
위와 같이 3개였던 webserver에 대해서 5개로 늘려준 뒤 get pods을 통해 확인해보면 정상적으로 자원의 개수가 변경된 것을 확인할 수 있다.
dry-run
container을 실행하지 않고, 실행되는 지 여부만 판단해보고 싶으면 dry-run option을 추가하면 된다.
kubectl run webserver --image=nginx:1.14 --port 80 --dry-run -o yaml > webserver-pod.yaml
-o 뒤에 yaml로 명시하게 되면 해당 명령어의 yaml 포맷으로 출력할 수 있게 된다.

webserver-pod.yaml
apiVersion: v1
kind: Pod
metadata:
  creationTimestamp: null
  labels:
    run: webserver
  name: webserver
spec:
  containers:
  - image: nginx:1.14
    name: webserver
    ports:
    - containerPort: 80
    resources: {}
  dnsPolicy: ClusterFirst
  restartPolicy: Always
status: {}
yaml 파일을 이용해서 container 생성
위의 yaml 파일을 이용해서 새로운 pod를 생성할 수 있다.
- 우선, 그러기 위해 기존의 동일한 이름의 pod를 제거하자
kubectl delete pod webserver
- 그런 다음, yaml 파일을 이용해서 pod를 만들어보자
kubectl create -f webserver-pod.yaml
- pod 생성 결과 확인
댓글남기기